My Passive polarised Dual-projector setup
Posted: Mon Aug 30, 2010 6:57 am
Hello everyone, I finally completed my Dual projector project, here is my report on how it's doing.
Note: I originally wrote this post at AVS forums on the Epson Home-cinema 8100 projector thread, since it was quite a long post I copied it here, so there is some "3D beginner" speech in the text I didn't remove.
Enjoy the article and do not hesitate to ask questions or comments.
I also keep a copy of this thread in the 3D displays section at AVS forums at the following thread : My Passive polarised Dual-projector setup
Recap on the setup : (all price info include tax & shipping)
-> Projectors : 2x Epson EH-TW3500 (European version of the Epson HomeCinema 8100)
Price 2x 1400 = 2800 € from French online shop
-> Screen : Harkness Spectral 240 (a professional cinema-grade Silver-screen designed for polarised 3D projection, known to be among the best surfaces for polarised 3D) 235x135cm (230x130cm visible), peak gain 2.4, peak polarisation extinction ratio 130:1 (manufacturer specs), aprox 105/106" diagonal
Price 507 £ (~600 €) from Harkness Screens UK
-> Screen frame : Home made aluminium frame with squared-section aluminum tubes. Screen attaches on top of the frame with 3M-Dual Lock tape
Price : ~100 € at local hardware store and two evenings of "hard" work
-> Polarising filters : Silverfabric POLAR-L-50 with projector mounts (heat resistant polarising filters, linear polarisation 45°/135°, designed to be able to dissipate the heat of projectors, transmitted light intensity up to 5000 Ansi Lumen without damage to the filters and with anti-reflective coating to reduce the amount of light reflected back inside the projector)
Peak polarisation extinction ratio 1000:1 (manufacturer specs)
Price : 669 € for the set of two filters and projector mounts
-> 3D Glasses : Linear 45°/135° 3D glasses, identical design to the RealD 3D glasses you get from cinemas except they are with linear filters instead of circular and different brand.
Price : 30€ for a box of 10 pairs of glasses (3€ per glasses) from Stereomax (French online 3D equipment shop)
Initial budget for the system : 4000 € (not including the computer or software)
Total for the system : aprox 4100 €
Video Source : My computer
Intel Core i5 750
4GB Ram
ATi Radeon HD5870
Windows 7 64bit
3 Displays connected and working simultaneously :
1x Zalman 22" interlaced 3D display (my standard monitor) : connected through Display Port and active DP->VGA adapter
2x Epson EH-TW3500 projectors : connected though DVI with DVI to Hdmi passive adapters.
-----------------------------------------------------
Before posting the pictures I would like to remind you that this is my first ever projector setup and the frame is also my first DIY project.
This is not a proper complete Home-cinema setup for a very simple reason :
My apartment is too small for the screen. I have had a lot of trouble finding enough space to assemble everything and I have to move furniture to be able to use the system, and then put the screen away once i'm finished with it so that I can resume normal use of the room. (As you will see on the pictures, the screen blocks the opening of main window)
I still did it this way because I know I will move to some other place some time next year.
I would also like to apologise for the the poor quality of the pictures. I do not have a proper camera, I have to use my camcorder photo mode which is quite bad. I've used the longest available exposure times (1/3 second) on a tripod to try and remove as much noise as possible but despite that, the pictures really don't do justice to the quality of the picture actually being displayed.
Here we go, enjoy and do not hesitate to ask if you have any questions
-----------------------------------------------------
The frame before mounting the screen

It's simply made of squared-section aluminium tubes attached together simply with screws. It is not rigid as steel but I have used anough attach points to make sure it is strong enough while being still very light, which is what I need. It can also be unmounted for transport when I'll move to some other place next year (the frame won't fit through the staircase)
It is also adjusted to be within +/-1mm of the actual screen size.
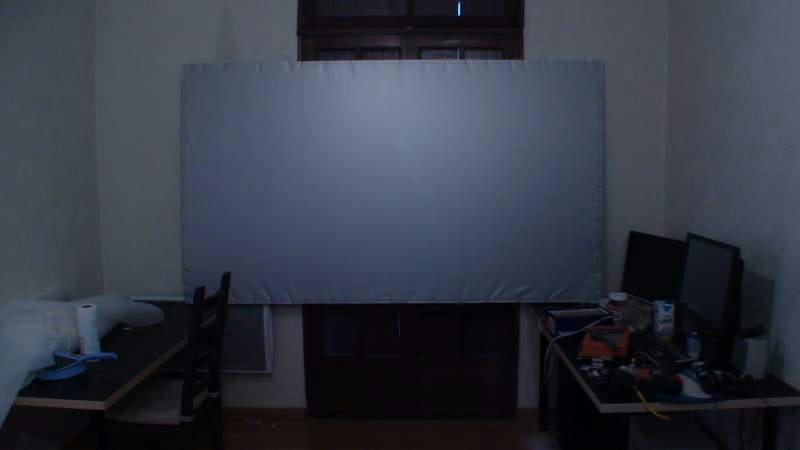
The complete screen :
This was my first screen ever and I was surprised how hard it is to tension the screen properly, not enough or too much tension and the screen starts to fold near the attach points. I also had to be careful with the amount of tension I used to make sure I would not damage the fragile silver-screen surface.
Indeed the projection surface is only a painted coating on a synthetic rubbery/latex material. When unrolling the screen for the first time, I immediately noticed it to the very strong smell of paint solvent coming from the material.
The screen has very little elasticity, I do not have any experience with other screens so I do not know if it explains why it is so hard to tension properly or if it's the same with other screens. Here is what the screen looked like on my first try :
It took me a lot of work but I eventually did it properly. It's much much better
This picture shows the screen in it's final position on the ground.
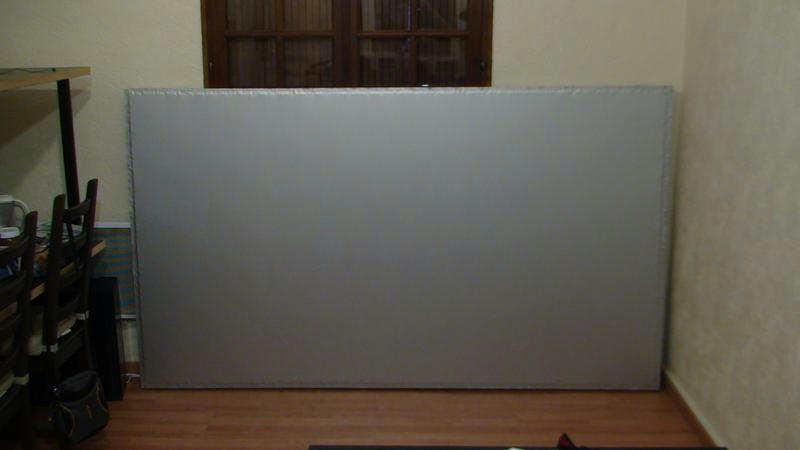
The screen is almost complete : I now need to add the final finishing touch :
I will add a piece of black plastic that folds over the edge of the frame. It will cover about 2.0~2.5cm from the edges and has multiple roles :
first, it will mask the edges of the screen where the attachment points are visible, it will also create a black-frame to make the frame look better as well as increasing the perceived contrast and finally it will also protect the edge of the frame against accidental hits against walls and furniture during manipulation. Since the apartment is so small, it tends to happen a lot. I do not want to damage my frame.
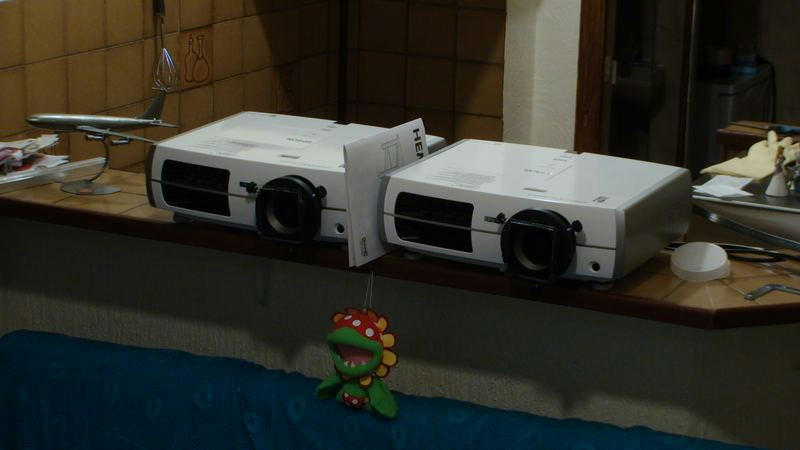
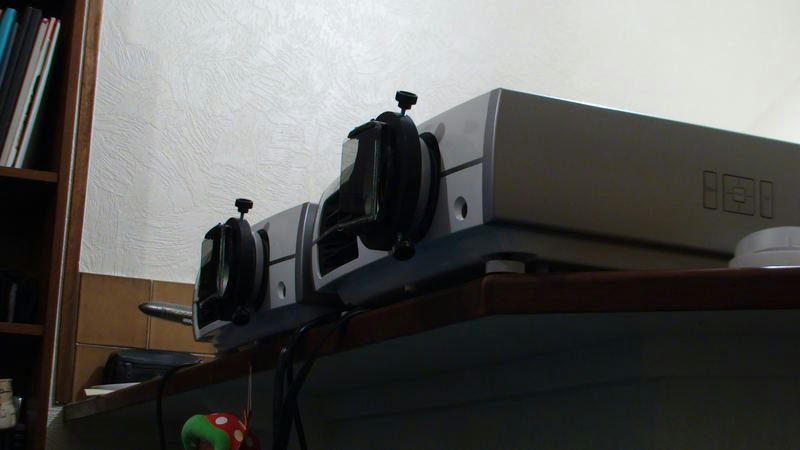
The projectors and the Living room :
I have used the greatest length of my living room in order to get the biggest picture possible (which is how i calculated the screen size I wanted).
The couch is 3m (9 feet) from the screen, just behind the couch is the bar which separates the kitchen area from the living room area. I put the projectors side by side on the bar.
I noticed yesterday evening that the hot air exhaust of the left projector was shooting straight on the right projector filter mount. The filter itself was protected and stayed cool but the mount itself was definitely getting hot. For safety I decided to add a separator to make sure the exhaust airflow would not disturb the filter in any way. I do not want the filter to overheat in any way. I used the first piece of paper i could find : it's the instruction booklet for mounting an IKEA table.
Picture quality
Well it's not that easy : at first when you just turn on the projectors the first time, you get a completely doubled up picture with completely wrong colours.
An alignment reference picture is worth a thousand words :
This is the DDD alignment test picture. You may already have seen it used by other websites to test the amount of crosstalk of 3DTVs. (download it here)
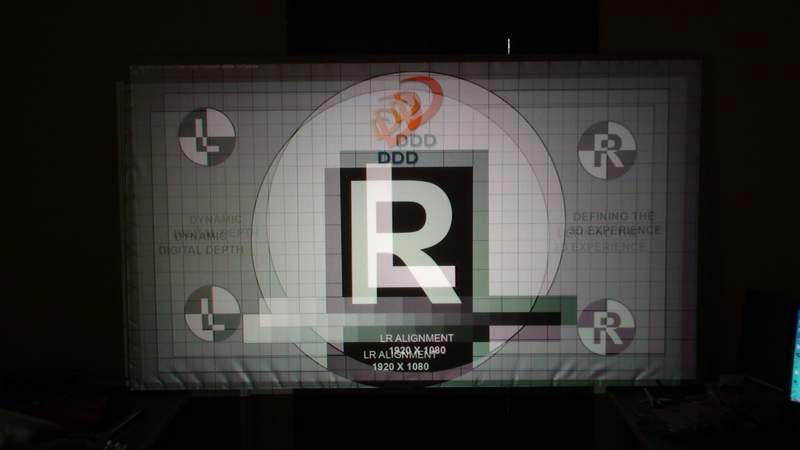
(note : this picture was taken with the 1st try of screen tensioning and the screen folding shows around the frame)
Two things must be done :
-first the projectors need to be lined up perfectly. This is done through the projector lens shift. At first the super-sensitive lens shift is quite hard to use. I was surprised by the fact the touching one axis on the lens shift would unlock the other axis, ruining your calibration due to the springs. It takes a while to get used to it be eventually, lining up the projectors becomes easy and is performed very quickly. But there is one annoying thing. No matter how precise you are, there is always some portion of the picture that is not perfectly lined up, I can line them almost perfectly but it's never perfect. It took me a few hours to find what it was until i finally understood that it's simply the lens that is not a perfect lens. When using the lens shift you move the lens and it creates small imperfection, a perfect lens costs thousands and thousands of Euro, consumer projectors just can't afford them : so the lenses curve the picture just a little. If I were to use only one projector I would have never ever noticed this but since I am trying to line-up two projectors, the differences show up.
-the second thing you notice on the picture is the colour difference.
This is because when i took this shot, the filters were not perfectly in place. But the colour shift is not due to the filters : it's due to the projectors.
Here is why : The Epson projectors are LCD projectors, which means that the light that comes out of it have gone through sets of polarising filters, the liquid crystal layer and an other set of polarisers, so the light is already polarised, so what's the issue about it ? The Epson projectors are not just LCD projectors : they are 3-LCD projectors. Each RGB component is created by a different polariser and the picture is then assembled by a set of mirrors. This results that some of the colour components are polarised vertically, while an other colour component is polarised horizontally.
This means that in order to display a colour neutral picture : the polarisers need to be placed precisely at angles of 45° and 135°. Well that's a good thing, that's what our filters are designed for (this was planned from the beginning).
It also means that placing the polarisers precisely at the proper angle becomes very easy : no need to use the glasses and close one eye just look at the screen until the picture becomes colour neutral and there you go.
This is what the picture looks like once lined up properly and with the filters in place :
(projector is set to use all default factory settings, colour mode "natural")
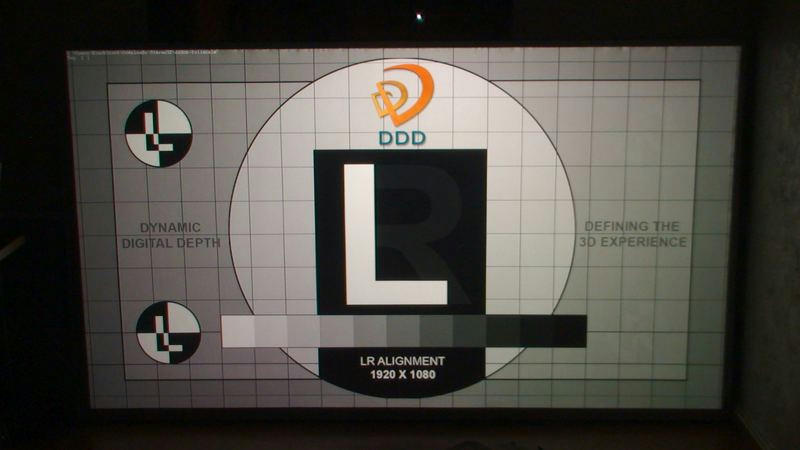
Picture without glasses (alignment test) :
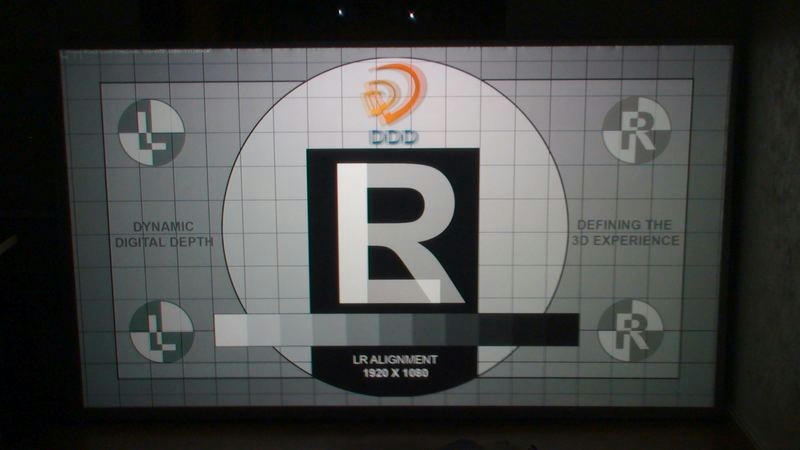
This is the two pictures (left and right) overlapping each other.
You can see the grid matches for most of the frame, except the bottom right corner. The picture doesn't have enough quality to really show the grid misalignment, it just becomes a bit blurry, that's not the camera focus, it's the projector misalignment.
Picture with the glasses (crosstalk test) :
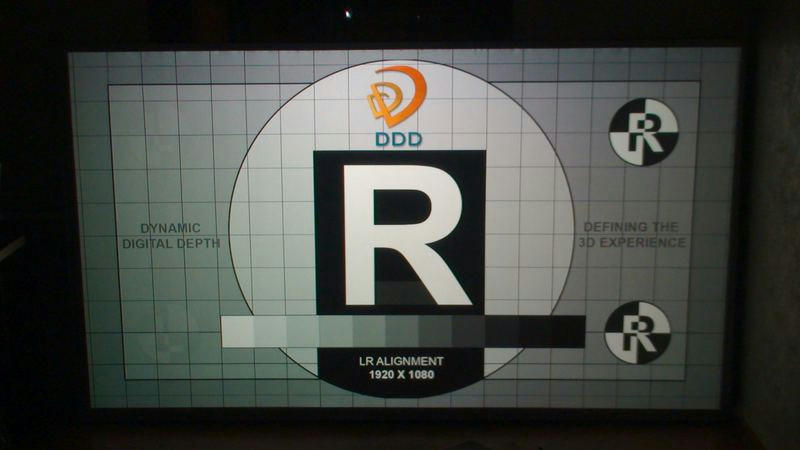
Two things to notice here :
-> Crosstalk : 3D Crosstalk is the phenomenon of some of the light intended for one eye to be improperly filtered and becoming visible into the wrong eye. Too much crosstalk and the viewer becomes unable to focus on the 3D picture, little crosstalk is usually not a problem. A perfect 3D system should have zero crosstalk but since this is the real world, predictably there is a little bit of it.
The picture shows the typical pattern of passive polarised systems : the maximum amount of crosstalk is shown when displaying pure white on pure black (the L & R letters in the centre of the picture), any other colour combination (the black&white circles on grey background in the corners) will show significantly less crosstalk, the amount varies linearly according to the brightness difference.
The source of crosstalk is the weakest link for the polarisation in the system : this means the silver-screen : filters have extinction ratios of about 1000:1 while the screen is only rated at 130:1, and this Harkness screen is one of the best screens currently available, most other silver-screens only have extinction ratios rating around 80:1.
If you have read a little about 3D you may already know that a polarised setup will never be absolutely crosstalk-free. It's a strong point used by people defending active shutter glass based 3D systems : in theory an active shutter glass system can be crosstalk free, but then you have to compare that with the actual products on the market and they show a completely different story.
I won't make a complete argument on why one is better than the other here since it's very tricky subject and that some people may have different priorities regarding the picture quality.
I'll just say that this result is extremely good. I have a preference for the look of passive polarised systems and that I am very satisfied with this amount of crosstalk.
-> Colour shift : the edges of the frame have a a slight colour shift, one side of the frame looks green-ish while the other is more purple-ish. I am not sure exactly about the source of this issue but I believe this is due to the lens of the projector modifying the polarisation angles of the light emitted by the LCD projector, twisting the natural polarisation of the 3-LCD panels. I cannot fix this, it's an issue caused by the non-perfect Lens and the 3-LCD projector system.
Possible fixes would be use a DLP projector (which emits non-polarised light and is not affected at all by this issue) or to have the 3D polarising filter built-in the LCD projector before the lens.
However I'm not ready to change projectors for this : I personally think the issue is small enough and I really do appreciate the huge flexibility of the Epson projectors which have no competition at this price range.
Picture quality in the real world
You have all been waiting for this picture, I know you have, it's the biggest 3D blockbuster ever, and here is how Avatar looks on my display... or at least how the trailer looks like (3D trailer captured from German satellite 3DTV broadcast).
(L+R picture : no glasses)
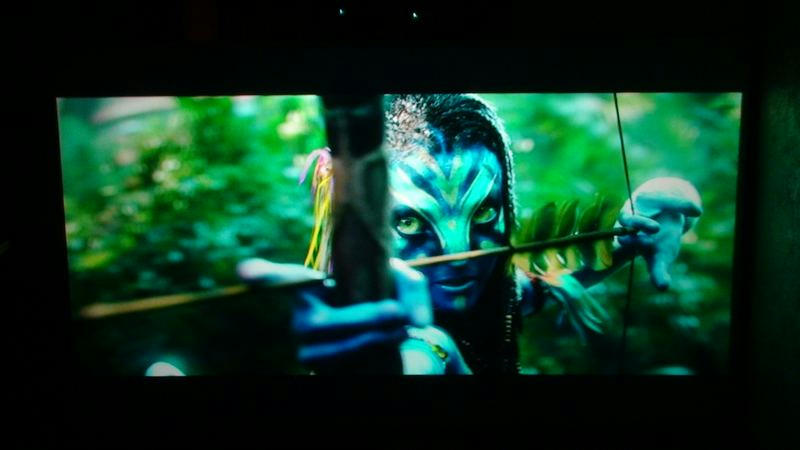
(Right eye only with glasses)

OK so first thing to remember : my camera with which i took this picture is absolute crap. On the screen this picture is gorgeous, super-sharp and the 3D depth is simply perfect. I am really lost for words to describe how good the picture looks. It's better and brighter than what I remembered from the cinema.
I have had this trailer on my computer for over three months, I watched it many times on my 22" 3D display, I discussed about it with some other 3D enthusiasts and they agree everything looked dull and flat on the small display, and now on the big screen it's a complete shock : it's how the movie was meant to be watched.
One thing is very clear : 3D movies are calibrated for the big screen and screen size is extremely important. 3D movies use very little camera separation, this means that when an object moves far in the distance or close to the camera, it will result in a separation between the left and right eye view of just a few pixels on the screen. If the screen is small these pixels are barely a few millimetres, flattening the frame, making the 3D effect look like cardboard cut-outs.
However is the screen is big, these few pixels translate in a few centimetres, which represent much much more depth, this time the 3D takes some real space and the characters and objects gain volume.
I found this shot (also from Avatar trailer) to demonstrate the purpose quite brilliantly :
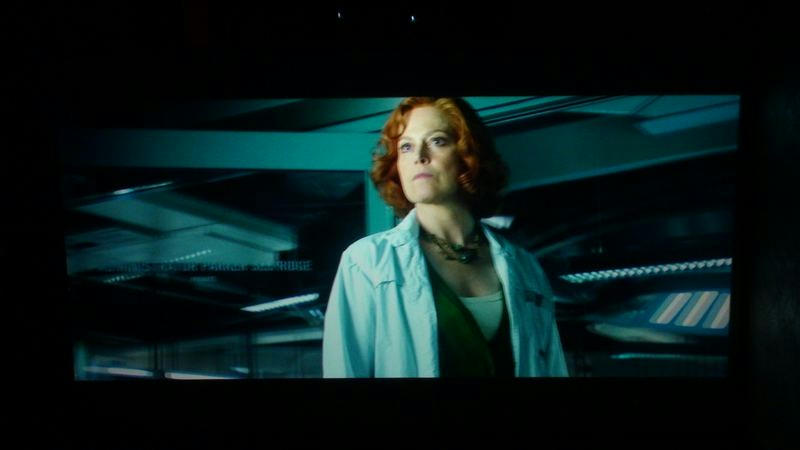
In this shot Grace (Sigourney Weaver) is in focus at screen depth, now look at the lights in the bottom right corder of the frame, these lights are in the background so they are strongly doubled. On a small screen this separation is very small so the object does not appear as far as it should be, the entire scene looks flattened.
Now on the big screen I measured how big the separation is : here is the picture (ruler is in centimetre)
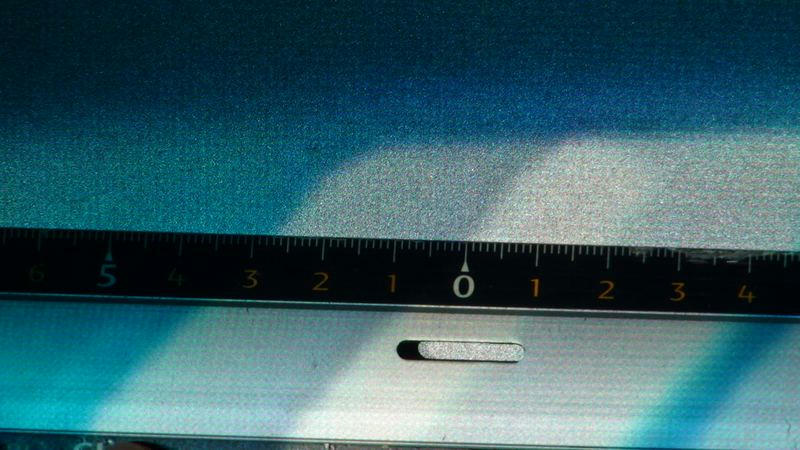
The maximum 3D effect achievable without giving a headache is if far objects are separated by 6.5cm (the distance between the two eyes) : this way the eyes look perfectly parallel to watch an object that should be far far away (at infinity). It works great but is very tiring for the eyes.
2.7cm is about 1/3 of this distance, giving a good looking 3D picture with enough depth while staying very comfortable and easy to the eye.
This is a good balance.
I reckon that one could watch 3D on screens up to 200" diagonal. Anything more than that and you would have to apply a small correction to the picture to prevent it from being too separated. Most 3D video players do have this feature though so it's not much of an issue.
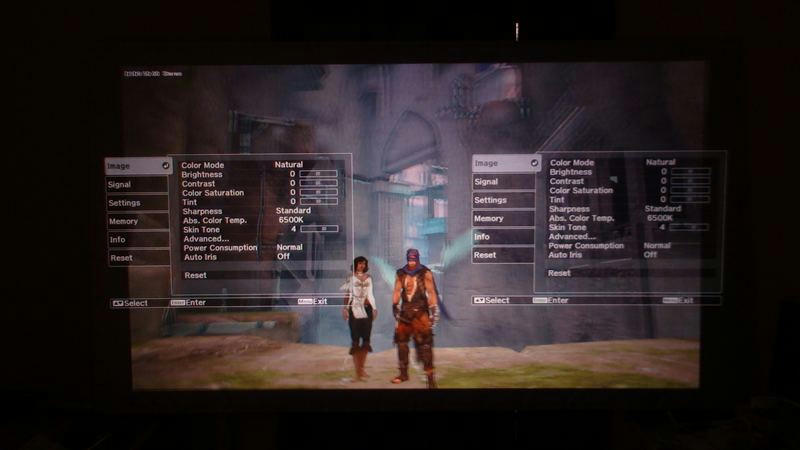
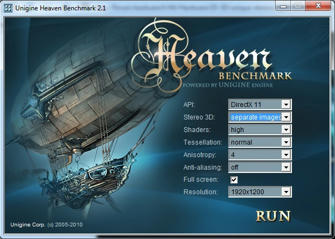
I also played some videogames, Here is the Unigine Heaven DX11 benchmark and a Prince of Persia (2008) screenshot with simultaneous dual projectors OSD operated in sync by one remote.
(L+R pictures : no glasses)
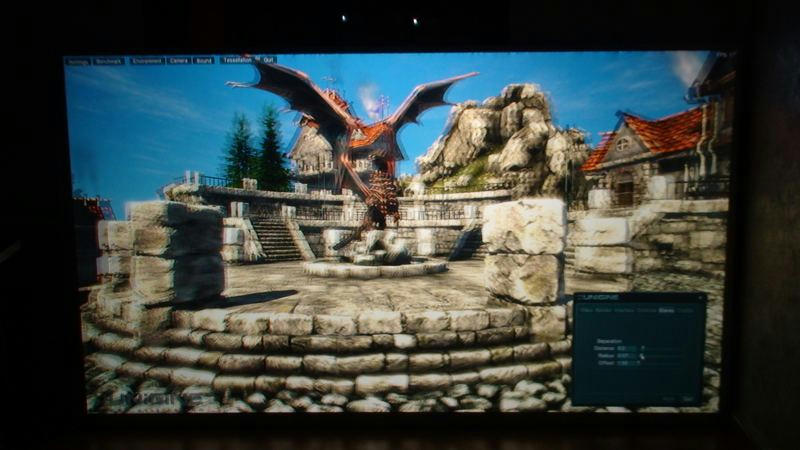
(Left eye only with glasses)
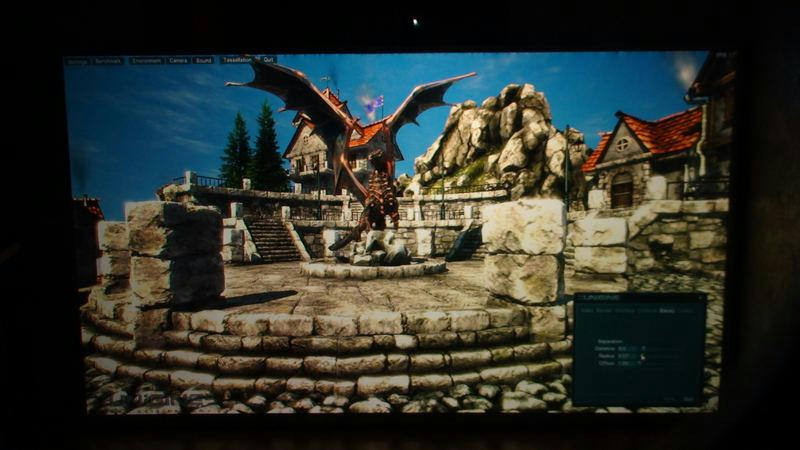
(L+R pictures : no glasses)
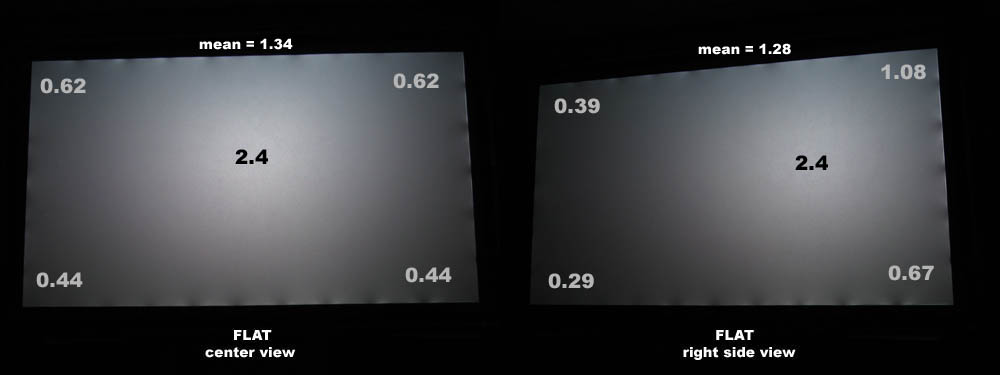
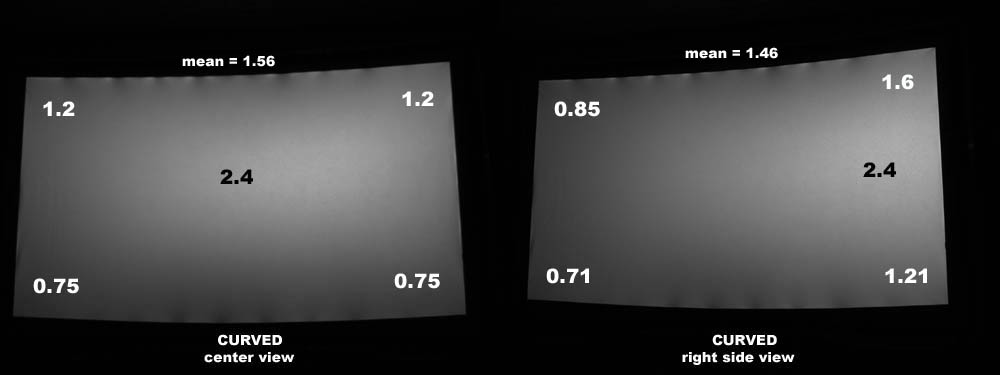
Hot-spot
All high gain screens are known to have a common weakness : hot-spotting. In order to provide a high gain in front of the screen, they have to reflect less light towards the sides, the centre of the picture which reflects light straight ahead tends to be brighter than the edges of the screen which reflect the light at an angle.
The Harkness Spectral 240 screen material is rated at 2.4 peak gain, so it is no exception to this rule and does suffer from hot-spotting. This is mostly visible on content with large uniform coloured areas. The DDD test image and browsing windows makes it obvious, however I was surprised to see how quickly the hot-spot dissolves into the picture the image starts to have some variety in it. CG animation movies make the hot-spot quite difficult to notice, but you can still kind of see it. With a rich and detailed movie like AVATAR, it's completely gone. An expert's eye could probably still see it, but to my eyes it's invisible.
The annoyance factor of the hot spot then boils down to the content you throw at the screen, some games or movies might be more problematic than others but overall I'm quite satisfied.
I consider the hot-spot a non-issue...
... and that's with the close seating position and short throw of the projectors, placing the projectors further behind and with a greater seating distance to the screen, it would reduce the view-angle difference between the centre of and edges of the frame : making the hot-spot even less visible.
2D image quality
This is where we're in trouble...
If you look closely at the previous picture (the 4th Avatar picture with the close up and the ruler), you can notice something with the screen : screen grain.
It does not show up on the other screenshots because my camera is just not good enough to pick it up but the Harkness Spectral 240 coating is only partly aluminium mixed with other paint stuff it has a tendency to reflect light in a uneven way, creating a very strong very visible grain effect, even though the actual surface is very smooth. When under strong illumination you can see the grain is composed of thousands of shining little stars. The grain is therefore very visible at close distance especially if the picture is bright. (the most obvious times to see the grain is when browsing windows).
when using 3D glasses, the picture becomes dimmer and the linear polarisation eats away a good portion of the bright reflections (known phenomenon to photographers working with linear polarising filters) making the picture comfortable enough to forget it or "see through" it, but for 2D there is no escape.
As you walk away from the screen the grain becomes progressively more and more uniform, unfortunately at 3 metres, the distance of my couch, the grain is still visible in a very obvious way in 2D. For 3D it's alright, you can forget it easily but if you're looking specifically for it it's still obvious.
It's only when I walk behind the couch 5metres away and more (in the kitchen area) that the grain dissolves completely into the picture.
So this silver screen is not a universal 2D/3D surface for the home. It's very good for 3D, it may be a good 2D/3D surface in the theatre as the audience is far away enough from the screen to not see the grain, but for 2D in the home it's simply not acceptable.
There is hope though. With the growing home cinema market, we've seen many new screen technologies appearing in the recent years for home high definition 2D presentation. I have high hopes for similar improvements in silverscreens during the next few years, especially with LG pushing for polarised with a dual-projectors-in-single-box coming soon for the high end projector market. I can't afford the projector but it like the technology and hope LG will continue developing such systems to push for more polarised home setups.
On the usage of a dual projector 3D system...
Using a 3D dual projector setup can be very easy or a horrible nightmare depending on how you look at it or what you want to do. But there is one thing that the dual projector setup has that no other 3D system has : the ability to tweak.
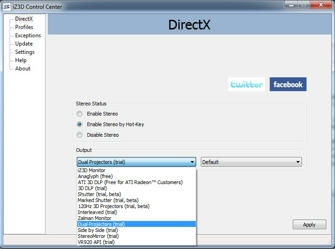
Most other 3D displays have a problem : the programs need to output a very special format to be able to display a 3D image (Interlaced 3D displays, iZ3D monitor). Some displays even need the programs to call a very specific API that cannot be used directly by the user (3D vision, Hdmi1.4 3DTVs).
In one way this is good, it puts the pressure on the 3D manufacturer to find developers to provide good applications that work. On the downside if you cannot find the right application for the job that supports your 3D system, you are screwed.
A Dual projector system is different : no hardware manufacturer really support it because it's mostly home-made so support mostly depend on the good will of developers to implement support on their own. But a dual projector setup has something very special that no other 3D display can do : if you can't find an app that works natively... you can try to hack around with the settings, and sometimes if the application you are using has enough customizable options you can make it work.
When applications support the system (the easy way)
Configuration is usually quite simple : just enable your screens normally like if they were independent screens and open the application that supports dual projectors.
The application will automatically send one picture to display #1 and the other to display #2 at precisely the same on screen location so that the left and right eye views match, sometimes even copying the windows cursor image to provide a seamless experience. If the left and right eye views aren't in the right order, the application almost always has a feature somewhere that allows you to swap the left and right eye views.
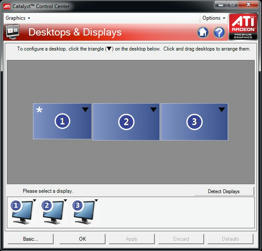
(note : the 3D projectors usually must be connected as display #1 & #2, on this screenshot the ATI control centre changed the order and determined the numbering according to which display i plugged first since the computer booted)
I have only used the system for short periods of time, I do no know yet all the software that is compatible but here are a few apps of interest I have tried so far :
-Stereoscopic player (well known video player among 3D users, plays almost every 3D video format except BluRay3D which is work in progress)
-sView (freeware, displays 3D pictures as well as 3D videos)
-Avatar : the videogame (the PC version offers native dual projector support)
-Unigine (video game engine) has embedded native 3D support, available if game developpers provide users the option to turn the 3D mode on. I used the Unigine benchmark for a picture shown above).
-iZ3D driver and DDD Tridef ignition drivers (the program automatically hack into DirectX video games to change the camera system in the games for a stereo 3D camera system and displays the picture on various sorts of 3D displays, including dual projectors. They work similarely to the Nvidia 3D Vision software except they work independently of the graphics card you use and support different hardware)
-Upcoming blockbuster videogame Crysis 2 has been announced to support dual projectors natively. The 3D support has also been added to their 3D engine Cry Engine 3 which they sell to other developers and which is available to the user if the game developers provide an option to turn the 3D on.
Issues : what could possibly be wrong with a natively implemented system ???
Well there is a bug. Since the arrival of Windows 7, it seems dual projectors users have synchronisation issues between the two displays and my system suffers from this symptom too. It is not much of a problem for displaying pictures but when the pictures start to move, the difference between the left and right eye starts to cause some big visual artefacts that can cause massive headaches in 3D.
Objects moving horizontally are suddenly no longer at their proper depth, objects that are in the background jumping to the foreground and vice-versa, objects moving vertically getting huge vertical separations : this is so bad that most videogames are unplayable and movies hurt the eyes, even Avatar (which has absolute perfect graphics in 3D)
I have read reports saying the latest Nvidia video drivers have finally solved this issue for their system, I am now waiting for ATi to release new driver updates, hoping for a fix. (ATi has announced releasing drivers supporting 3DTVs before the end of the year, I hope the fix for dual projectors will come with it).
So here we are : 3D ready apps do not work properly, are we screwed ? (have I spent all that money for nothing ?)
Of course no ! because dual projectors have this very special ability to be a very flexible and tweakable system : let's work around the issue and make stuff work !
When stuff doesn't work, work around the issue and make it work anyways !
The synchronization problem is the #1 issue for dual projectors, fortunately it's only a software issue with the graphics card drivers. I know that because there is a simple way of making two displays perfectly synchronized with the ATI display drivers : Eyefinity
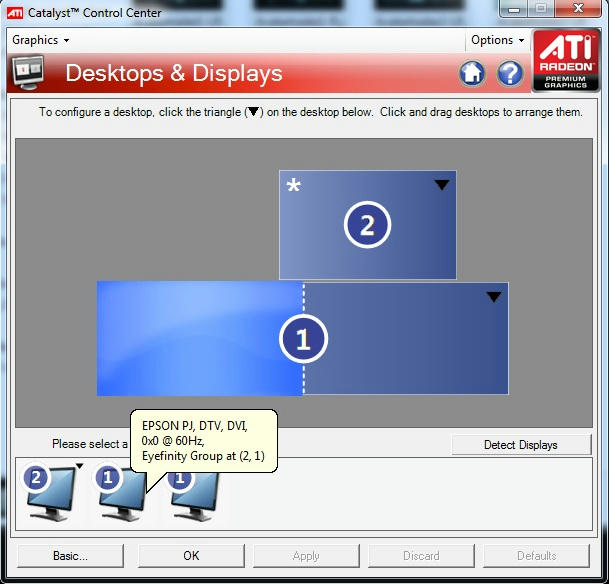
Eyefinity is ATi's solution for super-widescreen multi-monitor gaming technology. What it does is basically making believe Windows and the games that you are using one huge seamless screen that spans over multiple screens instead of using multiple smaller monitors. The games and applications only see one big screen as a whole unity so there is no screen border or display number to confuse the application. What's more the displays are always kept in perfect sync, solving the display synchronisation issue.
The whole trick is then to make your applications show the left eye picture on the left half of the huge screen and the right eye picture on the right half of the huge screen.
Viewing picture and movies is actually quite easy since they are traditionally stored side by side, all you have to do is to playback in full screen, maybe use the video player scaler to stretch the picture if necessary and off you go.
For example this is how I played the Avatar trailer in the screenshots above : i used my usual MediaPlayerClassic Home-cinema to play the wmv file and scaled to stretch the frame to full screen. The application is not 3D ready, it did not even know it was a 3D file but it just worked.
The same goes for pictures : the DDD alignment test frame shown in the previous post was displayed through a conventional 2D picture viewer : Xnview in a similar way.
Making games work is more difficult : 3D drivers like iZ3D has a mode for displaying the left and right eye views side by side on the same screen, which is what we need, unfortunately this mode is designed for 3DTVs so it compresses the frame horizontally after rendering, which is not what we need : we want full resolution side by side.
It is still possible to play games if the game allows us to use anamorphic rendering : rendering a 16:9 aspect ratio frame, then stretched to 32:9, which the iZ3D driver finally stretches back to 2x 16:9 side by side.
Some games allow it but they are few and these options have to be tweaked in .ini files. For example I successfully played AudioSurf this way (which is known to always render 4:3 and stretches to whatever display ratio you use).
I also tried to render Avatar the video game this way, unfortunately the use of custom aspect ratios seem to interfere with the native 3D side by side mode, so I'm stuck on this game. I spent an entire evening messing around in the .xml config file of the game to try and find a solution without success. The best I could get was a 1920x1080 rendered anamorphic super-wide screen 32:9 aspect ratio picture squashed to 16:9 screen ratio : the picture was indeed 3D but with the wrong ratio.
I have not tried any other game so far but i am convinced that I can run many other games this way
On BluRay 3D compatibility
I know it's a must have for film enthusiasts but I'm mostly a video game fan, not so much a film guy.
At the moment there are no BluRay3D capable software that support dual projector setups, I know it's just a question of time. Given the current amount of 3D BluRays on the market, there is no real rush, I am not starving for content, there is so much I want to try and experiment with first. I just hope we'll get more universal software by the time Avatar BluRay3D hits the shelves officially (not in the Panasonic exclusive tie-in) that means not before mid 2011.
In the mean time it is still possible to decompress the BluRay3D film into full resolution left and right eye views ready for viewing on a dual projector setup with some software i've seen on a Norwegian website (Biohemmet.se), but the operation lasts for an entire night, and eats a lot of HDD space so I'm not really fond of the solution, I have yet to try it but I know it is possible and it works.
Conclusion
This is a review i would like to not conclude just yet : I have not found everything there is to know or done everything there is to do with the Dual projector passive 3D setup. I am still beginning to use it, but for now I am very impressed with it and do not regret spending my money in any way. It's the best 3D setup I have had the opportunity to see, it's definitely better and brighter than what I can get at my local RealD cinema.
I'll probably have to get a secondary screen for 2D viewing, probably something simple and cheap to roll/unroll over the frame. (it will also protect the 3D frame from dust) I am not a 2D film enthusiast, I do not have much of a DVD or BluRay film collection at all, i mainly use the projectors for 3D and 3D without compromise was the purpose of this project from the beginning.
I will probably come back with more details and updates as they happen, and maybe better screenshots if I ever buy a better camera, and why not put the pic in the screenshot war thread.
Any way if you have any question or request, do not hesitate to ask. I'll be glad to try my best to answer.
(maybe I should put a copy of this post in the 3D section, what do you think ?)
Note: I originally wrote this post at AVS forums on the Epson Home-cinema 8100 projector thread, since it was quite a long post I copied it here, so there is some "3D beginner" speech in the text I didn't remove.
Enjoy the article and do not hesitate to ask questions or comments.
I also keep a copy of this thread in the 3D displays section at AVS forums at the following thread : My Passive polarised Dual-projector setup
Recap on the setup : (all price info include tax & shipping)
-> Projectors : 2x Epson EH-TW3500 (European version of the Epson HomeCinema 8100)
Price 2x 1400 = 2800 € from French online shop
-> Screen : Harkness Spectral 240 (a professional cinema-grade Silver-screen designed for polarised 3D projection, known to be among the best surfaces for polarised 3D) 235x135cm (230x130cm visible), peak gain 2.4, peak polarisation extinction ratio 130:1 (manufacturer specs), aprox 105/106" diagonal
Price 507 £ (~600 €) from Harkness Screens UK
-> Screen frame : Home made aluminium frame with squared-section aluminum tubes. Screen attaches on top of the frame with 3M-Dual Lock tape
Price : ~100 € at local hardware store and two evenings of "hard" work
-> Polarising filters : Silverfabric POLAR-L-50 with projector mounts (heat resistant polarising filters, linear polarisation 45°/135°, designed to be able to dissipate the heat of projectors, transmitted light intensity up to 5000 Ansi Lumen without damage to the filters and with anti-reflective coating to reduce the amount of light reflected back inside the projector)
Peak polarisation extinction ratio 1000:1 (manufacturer specs)
Price : 669 € for the set of two filters and projector mounts
-> 3D Glasses : Linear 45°/135° 3D glasses, identical design to the RealD 3D glasses you get from cinemas except they are with linear filters instead of circular and different brand.
Price : 30€ for a box of 10 pairs of glasses (3€ per glasses) from Stereomax (French online 3D equipment shop)
Initial budget for the system : 4000 € (not including the computer or software)
Total for the system : aprox 4100 €
Video Source : My computer
Intel Core i5 750
4GB Ram
ATi Radeon HD5870
Windows 7 64bit
3 Displays connected and working simultaneously :
1x Zalman 22" interlaced 3D display (my standard monitor) : connected through Display Port and active DP->VGA adapter
2x Epson EH-TW3500 projectors : connected though DVI with DVI to Hdmi passive adapters.
-----------------------------------------------------
Before posting the pictures I would like to remind you that this is my first ever projector setup and the frame is also my first DIY project.
This is not a proper complete Home-cinema setup for a very simple reason :
My apartment is too small for the screen. I have had a lot of trouble finding enough space to assemble everything and I have to move furniture to be able to use the system, and then put the screen away once i'm finished with it so that I can resume normal use of the room. (As you will see on the pictures, the screen blocks the opening of main window)
I still did it this way because I know I will move to some other place some time next year.
I would also like to apologise for the the poor quality of the pictures. I do not have a proper camera, I have to use my camcorder photo mode which is quite bad. I've used the longest available exposure times (1/3 second) on a tripod to try and remove as much noise as possible but despite that, the pictures really don't do justice to the quality of the picture actually being displayed.
Here we go, enjoy and do not hesitate to ask if you have any questions
-----------------------------------------------------
The frame before mounting the screen

It's simply made of squared-section aluminium tubes attached together simply with screws. It is not rigid as steel but I have used anough attach points to make sure it is strong enough while being still very light, which is what I need. It can also be unmounted for transport when I'll move to some other place next year (the frame won't fit through the staircase)
It is also adjusted to be within +/-1mm of the actual screen size.
The complete screen :
This was my first screen ever and I was surprised how hard it is to tension the screen properly, not enough or too much tension and the screen starts to fold near the attach points. I also had to be careful with the amount of tension I used to make sure I would not damage the fragile silver-screen surface.
Indeed the projection surface is only a painted coating on a synthetic rubbery/latex material. When unrolling the screen for the first time, I immediately noticed it to the very strong smell of paint solvent coming from the material.
The screen has very little elasticity, I do not have any experience with other screens so I do not know if it explains why it is so hard to tension properly or if it's the same with other screens. Here is what the screen looked like on my first try :
It took me a lot of work but I eventually did it properly. It's much much better
This picture shows the screen in it's final position on the ground.
The screen is almost complete : I now need to add the final finishing touch :
I will add a piece of black plastic that folds over the edge of the frame. It will cover about 2.0~2.5cm from the edges and has multiple roles :
first, it will mask the edges of the screen where the attachment points are visible, it will also create a black-frame to make the frame look better as well as increasing the perceived contrast and finally it will also protect the edge of the frame against accidental hits against walls and furniture during manipulation. Since the apartment is so small, it tends to happen a lot. I do not want to damage my frame.
The projectors and the Living room :
I have used the greatest length of my living room in order to get the biggest picture possible (which is how i calculated the screen size I wanted).
The couch is 3m (9 feet) from the screen, just behind the couch is the bar which separates the kitchen area from the living room area. I put the projectors side by side on the bar.
I noticed yesterday evening that the hot air exhaust of the left projector was shooting straight on the right projector filter mount. The filter itself was protected and stayed cool but the mount itself was definitely getting hot. For safety I decided to add a separator to make sure the exhaust airflow would not disturb the filter in any way. I do not want the filter to overheat in any way. I used the first piece of paper i could find : it's the instruction booklet for mounting an IKEA table.
Picture quality
Well it's not that easy : at first when you just turn on the projectors the first time, you get a completely doubled up picture with completely wrong colours.
An alignment reference picture is worth a thousand words :
This is the DDD alignment test picture. You may already have seen it used by other websites to test the amount of crosstalk of 3DTVs. (download it here)
(note : this picture was taken with the 1st try of screen tensioning and the screen folding shows around the frame)
Two things must be done :
-first the projectors need to be lined up perfectly. This is done through the projector lens shift. At first the super-sensitive lens shift is quite hard to use. I was surprised by the fact the touching one axis on the lens shift would unlock the other axis, ruining your calibration due to the springs. It takes a while to get used to it be eventually, lining up the projectors becomes easy and is performed very quickly. But there is one annoying thing. No matter how precise you are, there is always some portion of the picture that is not perfectly lined up, I can line them almost perfectly but it's never perfect. It took me a few hours to find what it was until i finally understood that it's simply the lens that is not a perfect lens. When using the lens shift you move the lens and it creates small imperfection, a perfect lens costs thousands and thousands of Euro, consumer projectors just can't afford them : so the lenses curve the picture just a little. If I were to use only one projector I would have never ever noticed this but since I am trying to line-up two projectors, the differences show up.
-the second thing you notice on the picture is the colour difference.
This is because when i took this shot, the filters were not perfectly in place. But the colour shift is not due to the filters : it's due to the projectors.
Here is why : The Epson projectors are LCD projectors, which means that the light that comes out of it have gone through sets of polarising filters, the liquid crystal layer and an other set of polarisers, so the light is already polarised, so what's the issue about it ? The Epson projectors are not just LCD projectors : they are 3-LCD projectors. Each RGB component is created by a different polariser and the picture is then assembled by a set of mirrors. This results that some of the colour components are polarised vertically, while an other colour component is polarised horizontally.
This means that in order to display a colour neutral picture : the polarisers need to be placed precisely at angles of 45° and 135°. Well that's a good thing, that's what our filters are designed for (this was planned from the beginning).
It also means that placing the polarisers precisely at the proper angle becomes very easy : no need to use the glasses and close one eye just look at the screen until the picture becomes colour neutral and there you go.
This is what the picture looks like once lined up properly and with the filters in place :
(projector is set to use all default factory settings, colour mode "natural")
Picture without glasses (alignment test) :
This is the two pictures (left and right) overlapping each other.
You can see the grid matches for most of the frame, except the bottom right corner. The picture doesn't have enough quality to really show the grid misalignment, it just becomes a bit blurry, that's not the camera focus, it's the projector misalignment.
Picture with the glasses (crosstalk test) :
Two things to notice here :
-> Crosstalk : 3D Crosstalk is the phenomenon of some of the light intended for one eye to be improperly filtered and becoming visible into the wrong eye. Too much crosstalk and the viewer becomes unable to focus on the 3D picture, little crosstalk is usually not a problem. A perfect 3D system should have zero crosstalk but since this is the real world, predictably there is a little bit of it.
The picture shows the typical pattern of passive polarised systems : the maximum amount of crosstalk is shown when displaying pure white on pure black (the L & R letters in the centre of the picture), any other colour combination (the black&white circles on grey background in the corners) will show significantly less crosstalk, the amount varies linearly according to the brightness difference.
The source of crosstalk is the weakest link for the polarisation in the system : this means the silver-screen : filters have extinction ratios of about 1000:1 while the screen is only rated at 130:1, and this Harkness screen is one of the best screens currently available, most other silver-screens only have extinction ratios rating around 80:1.
If you have read a little about 3D you may already know that a polarised setup will never be absolutely crosstalk-free. It's a strong point used by people defending active shutter glass based 3D systems : in theory an active shutter glass system can be crosstalk free, but then you have to compare that with the actual products on the market and they show a completely different story.
I won't make a complete argument on why one is better than the other here since it's very tricky subject and that some people may have different priorities regarding the picture quality.
I'll just say that this result is extremely good. I have a preference for the look of passive polarised systems and that I am very satisfied with this amount of crosstalk.
-> Colour shift : the edges of the frame have a a slight colour shift, one side of the frame looks green-ish while the other is more purple-ish. I am not sure exactly about the source of this issue but I believe this is due to the lens of the projector modifying the polarisation angles of the light emitted by the LCD projector, twisting the natural polarisation of the 3-LCD panels. I cannot fix this, it's an issue caused by the non-perfect Lens and the 3-LCD projector system.
Possible fixes would be use a DLP projector (which emits non-polarised light and is not affected at all by this issue) or to have the 3D polarising filter built-in the LCD projector before the lens.
However I'm not ready to change projectors for this : I personally think the issue is small enough and I really do appreciate the huge flexibility of the Epson projectors which have no competition at this price range.
Picture quality in the real world
You have all been waiting for this picture, I know you have, it's the biggest 3D blockbuster ever, and here is how Avatar looks on my display... or at least how the trailer looks like (3D trailer captured from German satellite 3DTV broadcast).
(L+R picture : no glasses)
(Right eye only with glasses)
OK so first thing to remember : my camera with which i took this picture is absolute crap. On the screen this picture is gorgeous, super-sharp and the 3D depth is simply perfect. I am really lost for words to describe how good the picture looks. It's better and brighter than what I remembered from the cinema.
I have had this trailer on my computer for over three months, I watched it many times on my 22" 3D display, I discussed about it with some other 3D enthusiasts and they agree everything looked dull and flat on the small display, and now on the big screen it's a complete shock : it's how the movie was meant to be watched.
One thing is very clear : 3D movies are calibrated for the big screen and screen size is extremely important. 3D movies use very little camera separation, this means that when an object moves far in the distance or close to the camera, it will result in a separation between the left and right eye view of just a few pixels on the screen. If the screen is small these pixels are barely a few millimetres, flattening the frame, making the 3D effect look like cardboard cut-outs.
However is the screen is big, these few pixels translate in a few centimetres, which represent much much more depth, this time the 3D takes some real space and the characters and objects gain volume.
I found this shot (also from Avatar trailer) to demonstrate the purpose quite brilliantly :
In this shot Grace (Sigourney Weaver) is in focus at screen depth, now look at the lights in the bottom right corder of the frame, these lights are in the background so they are strongly doubled. On a small screen this separation is very small so the object does not appear as far as it should be, the entire scene looks flattened.
Now on the big screen I measured how big the separation is : here is the picture (ruler is in centimetre)
The maximum 3D effect achievable without giving a headache is if far objects are separated by 6.5cm (the distance between the two eyes) : this way the eyes look perfectly parallel to watch an object that should be far far away (at infinity). It works great but is very tiring for the eyes.
2.7cm is about 1/3 of this distance, giving a good looking 3D picture with enough depth while staying very comfortable and easy to the eye.
This is a good balance.
I reckon that one could watch 3D on screens up to 200" diagonal. Anything more than that and you would have to apply a small correction to the picture to prevent it from being too separated. Most 3D video players do have this feature though so it's not much of an issue.
I also played some videogames, Here is the Unigine Heaven DX11 benchmark and a Prince of Persia (2008) screenshot with simultaneous dual projectors OSD operated in sync by one remote.
(L+R pictures : no glasses)
(Left eye only with glasses)
(L+R pictures : no glasses)
Hot-spot
All high gain screens are known to have a common weakness : hot-spotting. In order to provide a high gain in front of the screen, they have to reflect less light towards the sides, the centre of the picture which reflects light straight ahead tends to be brighter than the edges of the screen which reflect the light at an angle.
The Harkness Spectral 240 screen material is rated at 2.4 peak gain, so it is no exception to this rule and does suffer from hot-spotting. This is mostly visible on content with large uniform coloured areas. The DDD test image and browsing windows makes it obvious, however I was surprised to see how quickly the hot-spot dissolves into the picture the image starts to have some variety in it. CG animation movies make the hot-spot quite difficult to notice, but you can still kind of see it. With a rich and detailed movie like AVATAR, it's completely gone. An expert's eye could probably still see it, but to my eyes it's invisible.
The annoyance factor of the hot spot then boils down to the content you throw at the screen, some games or movies might be more problematic than others but overall I'm quite satisfied.
I consider the hot-spot a non-issue...
... and that's with the close seating position and short throw of the projectors, placing the projectors further behind and with a greater seating distance to the screen, it would reduce the view-angle difference between the centre of and edges of the frame : making the hot-spot even less visible.
2D image quality
This is where we're in trouble...
If you look closely at the previous picture (the 4th Avatar picture with the close up and the ruler), you can notice something with the screen : screen grain.
It does not show up on the other screenshots because my camera is just not good enough to pick it up but the Harkness Spectral 240 coating is only partly aluminium mixed with other paint stuff it has a tendency to reflect light in a uneven way, creating a very strong very visible grain effect, even though the actual surface is very smooth. When under strong illumination you can see the grain is composed of thousands of shining little stars. The grain is therefore very visible at close distance especially if the picture is bright. (the most obvious times to see the grain is when browsing windows).
when using 3D glasses, the picture becomes dimmer and the linear polarisation eats away a good portion of the bright reflections (known phenomenon to photographers working with linear polarising filters) making the picture comfortable enough to forget it or "see through" it, but for 2D there is no escape.
As you walk away from the screen the grain becomes progressively more and more uniform, unfortunately at 3 metres, the distance of my couch, the grain is still visible in a very obvious way in 2D. For 3D it's alright, you can forget it easily but if you're looking specifically for it it's still obvious.
It's only when I walk behind the couch 5metres away and more (in the kitchen area) that the grain dissolves completely into the picture.
So this silver screen is not a universal 2D/3D surface for the home. It's very good for 3D, it may be a good 2D/3D surface in the theatre as the audience is far away enough from the screen to not see the grain, but for 2D in the home it's simply not acceptable.
There is hope though. With the growing home cinema market, we've seen many new screen technologies appearing in the recent years for home high definition 2D presentation. I have high hopes for similar improvements in silverscreens during the next few years, especially with LG pushing for polarised with a dual-projectors-in-single-box coming soon for the high end projector market. I can't afford the projector but it like the technology and hope LG will continue developing such systems to push for more polarised home setups.
On the usage of a dual projector 3D system...
Using a 3D dual projector setup can be very easy or a horrible nightmare depending on how you look at it or what you want to do. But there is one thing that the dual projector setup has that no other 3D system has : the ability to tweak.
Most other 3D displays have a problem : the programs need to output a very special format to be able to display a 3D image (Interlaced 3D displays, iZ3D monitor). Some displays even need the programs to call a very specific API that cannot be used directly by the user (3D vision, Hdmi1.4 3DTVs).
In one way this is good, it puts the pressure on the 3D manufacturer to find developers to provide good applications that work. On the downside if you cannot find the right application for the job that supports your 3D system, you are screwed.
A Dual projector system is different : no hardware manufacturer really support it because it's mostly home-made so support mostly depend on the good will of developers to implement support on their own. But a dual projector setup has something very special that no other 3D display can do : if you can't find an app that works natively... you can try to hack around with the settings, and sometimes if the application you are using has enough customizable options you can make it work.
When applications support the system (the easy way)
Configuration is usually quite simple : just enable your screens normally like if they were independent screens and open the application that supports dual projectors.
The application will automatically send one picture to display #1 and the other to display #2 at precisely the same on screen location so that the left and right eye views match, sometimes even copying the windows cursor image to provide a seamless experience. If the left and right eye views aren't in the right order, the application almost always has a feature somewhere that allows you to swap the left and right eye views.
(note : the 3D projectors usually must be connected as display #1 & #2, on this screenshot the ATI control centre changed the order and determined the numbering according to which display i plugged first since the computer booted)
I have only used the system for short periods of time, I do no know yet all the software that is compatible but here are a few apps of interest I have tried so far :
-Stereoscopic player (well known video player among 3D users, plays almost every 3D video format except BluRay3D which is work in progress)
-sView (freeware, displays 3D pictures as well as 3D videos)
-Avatar : the videogame (the PC version offers native dual projector support)
-Unigine (video game engine) has embedded native 3D support, available if game developpers provide users the option to turn the 3D mode on. I used the Unigine benchmark for a picture shown above).
-iZ3D driver and DDD Tridef ignition drivers (the program automatically hack into DirectX video games to change the camera system in the games for a stereo 3D camera system and displays the picture on various sorts of 3D displays, including dual projectors. They work similarely to the Nvidia 3D Vision software except they work independently of the graphics card you use and support different hardware)
-Upcoming blockbuster videogame Crysis 2 has been announced to support dual projectors natively. The 3D support has also been added to their 3D engine Cry Engine 3 which they sell to other developers and which is available to the user if the game developers provide an option to turn the 3D on.
Issues : what could possibly be wrong with a natively implemented system ???
Well there is a bug. Since the arrival of Windows 7, it seems dual projectors users have synchronisation issues between the two displays and my system suffers from this symptom too. It is not much of a problem for displaying pictures but when the pictures start to move, the difference between the left and right eye starts to cause some big visual artefacts that can cause massive headaches in 3D.
Objects moving horizontally are suddenly no longer at their proper depth, objects that are in the background jumping to the foreground and vice-versa, objects moving vertically getting huge vertical separations : this is so bad that most videogames are unplayable and movies hurt the eyes, even Avatar (which has absolute perfect graphics in 3D)
I have read reports saying the latest Nvidia video drivers have finally solved this issue for their system, I am now waiting for ATi to release new driver updates, hoping for a fix. (ATi has announced releasing drivers supporting 3DTVs before the end of the year, I hope the fix for dual projectors will come with it).
So here we are : 3D ready apps do not work properly, are we screwed ? (have I spent all that money for nothing ?)
Of course no ! because dual projectors have this very special ability to be a very flexible and tweakable system : let's work around the issue and make stuff work !
When stuff doesn't work, work around the issue and make it work anyways !
The synchronization problem is the #1 issue for dual projectors, fortunately it's only a software issue with the graphics card drivers. I know that because there is a simple way of making two displays perfectly synchronized with the ATI display drivers : Eyefinity
Eyefinity is ATi's solution for super-widescreen multi-monitor gaming technology. What it does is basically making believe Windows and the games that you are using one huge seamless screen that spans over multiple screens instead of using multiple smaller monitors. The games and applications only see one big screen as a whole unity so there is no screen border or display number to confuse the application. What's more the displays are always kept in perfect sync, solving the display synchronisation issue.
The whole trick is then to make your applications show the left eye picture on the left half of the huge screen and the right eye picture on the right half of the huge screen.
Viewing picture and movies is actually quite easy since they are traditionally stored side by side, all you have to do is to playback in full screen, maybe use the video player scaler to stretch the picture if necessary and off you go.
For example this is how I played the Avatar trailer in the screenshots above : i used my usual MediaPlayerClassic Home-cinema to play the wmv file and scaled to stretch the frame to full screen. The application is not 3D ready, it did not even know it was a 3D file but it just worked.
The same goes for pictures : the DDD alignment test frame shown in the previous post was displayed through a conventional 2D picture viewer : Xnview in a similar way.
Making games work is more difficult : 3D drivers like iZ3D has a mode for displaying the left and right eye views side by side on the same screen, which is what we need, unfortunately this mode is designed for 3DTVs so it compresses the frame horizontally after rendering, which is not what we need : we want full resolution side by side.
It is still possible to play games if the game allows us to use anamorphic rendering : rendering a 16:9 aspect ratio frame, then stretched to 32:9, which the iZ3D driver finally stretches back to 2x 16:9 side by side.
Some games allow it but they are few and these options have to be tweaked in .ini files. For example I successfully played AudioSurf this way (which is known to always render 4:3 and stretches to whatever display ratio you use).
I also tried to render Avatar the video game this way, unfortunately the use of custom aspect ratios seem to interfere with the native 3D side by side mode, so I'm stuck on this game. I spent an entire evening messing around in the .xml config file of the game to try and find a solution without success. The best I could get was a 1920x1080 rendered anamorphic super-wide screen 32:9 aspect ratio picture squashed to 16:9 screen ratio : the picture was indeed 3D but with the wrong ratio.
I have not tried any other game so far but i am convinced that I can run many other games this way
On BluRay 3D compatibility
I know it's a must have for film enthusiasts but I'm mostly a video game fan, not so much a film guy.
At the moment there are no BluRay3D capable software that support dual projector setups, I know it's just a question of time. Given the current amount of 3D BluRays on the market, there is no real rush, I am not starving for content, there is so much I want to try and experiment with first. I just hope we'll get more universal software by the time Avatar BluRay3D hits the shelves officially (not in the Panasonic exclusive tie-in) that means not before mid 2011.
In the mean time it is still possible to decompress the BluRay3D film into full resolution left and right eye views ready for viewing on a dual projector setup with some software i've seen on a Norwegian website (Biohemmet.se), but the operation lasts for an entire night, and eats a lot of HDD space so I'm not really fond of the solution, I have yet to try it but I know it is possible and it works.
Conclusion
This is a review i would like to not conclude just yet : I have not found everything there is to know or done everything there is to do with the Dual projector passive 3D setup. I am still beginning to use it, but for now I am very impressed with it and do not regret spending my money in any way. It's the best 3D setup I have had the opportunity to see, it's definitely better and brighter than what I can get at my local RealD cinema.
I'll probably have to get a secondary screen for 2D viewing, probably something simple and cheap to roll/unroll over the frame. (it will also protect the 3D frame from dust) I am not a 2D film enthusiast, I do not have much of a DVD or BluRay film collection at all, i mainly use the projectors for 3D and 3D without compromise was the purpose of this project from the beginning.
I will probably come back with more details and updates as they happen, and maybe better screenshots if I ever buy a better camera, and why not put the pic in the screenshot war thread.
Any way if you have any question or request, do not hesitate to ask. I'll be glad to try my best to answer.
(maybe I should put a copy of this post in the 3D section, what do you think ?)