
~~~~~~~~~~~~~~~~~~~~~~~~~~~~~~~~~~~~~~~~~~~~~
1. Simple HUD Depth Fix
~~~~~~~~~~~~~~~~~~~~~~~~~
This section guides you HOW-TO simply move the complete HUD/UI of a game into depth. PLEASE NOTE: There may be much more things a game needs to fix HUD/UI, but this should work for approx 95 % of the games out there and is the simplest fix you can do. This ONLY works if the HUD/UI element is @ screen depth.
1. Exit the game
- Make sure the game is not started
2. Activate Shader Hunting
- Open d3dx.ini in the directory where you have installed the a fix OR 3DMigoto in a txt editor or in notepad
- Search for "hunting=0" (without "") ==> NOTE: May be its called "hunting = 0"
-- NOTE: In the UNITY-UNIVERSAL-FIX from DHR its is "hunting=2"
- Change it to "hunting=1" (without "")
- Example:
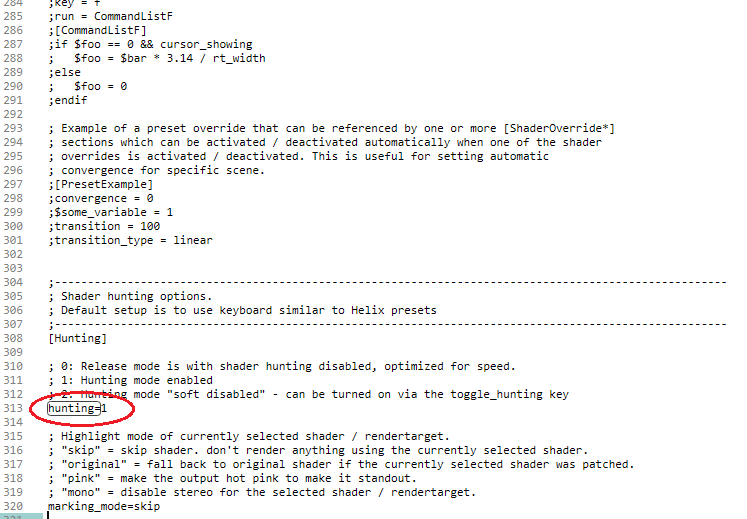
- Save the file
- Start the game.
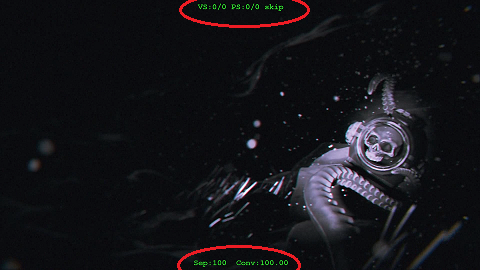
3. Shader Hunting
- In game, you should now see some green text ath te bottom and the top of the screen
- Example:
- Use NUMPAD5 to cycle through the vertex shaders until the HUD/UI effect disappears
-- NOTE: BE AWARE: ONLY the HUD/UI should be disabled, NOTHING MORE! Otherwhise its the wrong shader in 99% if the cases! (Or its more complicated to fix the HUD that i will not explain here ^^)
-- NOTE: Often you miss a shader because of the cycling speed and its only OFF for a short time and the effect comes back to when the next one is switched through. You can switch off the previously switched off vertex shader with the NUMPAD4 key.
--NOTE: Often HUD/UI consists of more than only one shader/element, you need to hunt those step by step and fix any of the hunted shaders by its own BUT: You can hunt this here and do not need to exit the game and fix all the hunted shaders later together
- Save the vertex shader THAT DISABLES YOUR HUD/UI-ELEMENT by pressing the NUMPAD6 key
- You will get a green message that the shader is saved.
-- NOTE: If there is a orange message that the shader compiling was wrong, you CANNOT use this tutorial to fix THIS HUD/UI-shader!
- exit the game
4. Modify Hunted Shader
- Enter ShaderFixes folder in your game directory
- Sort by latest
- Your just saved shaders should be appear at the top
-- NOTE: You may have .JPS files here, you can delete those
- Saved Vertex-Shaders should be called like this: 4570126e312f169d7-vs_replace.txt (4570126e312f169d7 <-- is random)
- Open the "XXXXXXXXXXXXXXXXX-vs_replace.txt" in a txt-editor, I SUGGEST Sublime Text 3 with HLSL plugin (https://packagecontrol.io/packages/Shad ... HLSL%20Cg)
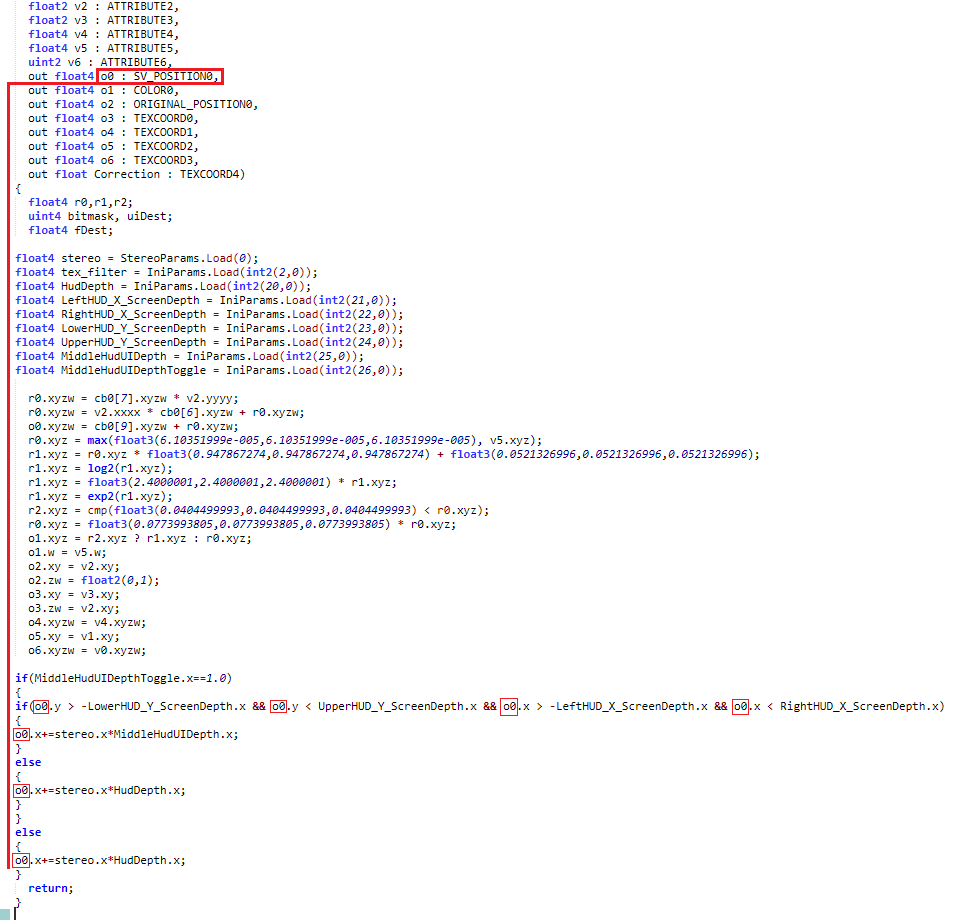
- Just search for "void main" (without ""), here you can see all input and output registers listed below each other. Depending on the shader, the list can be longer or shorter.
- Example:
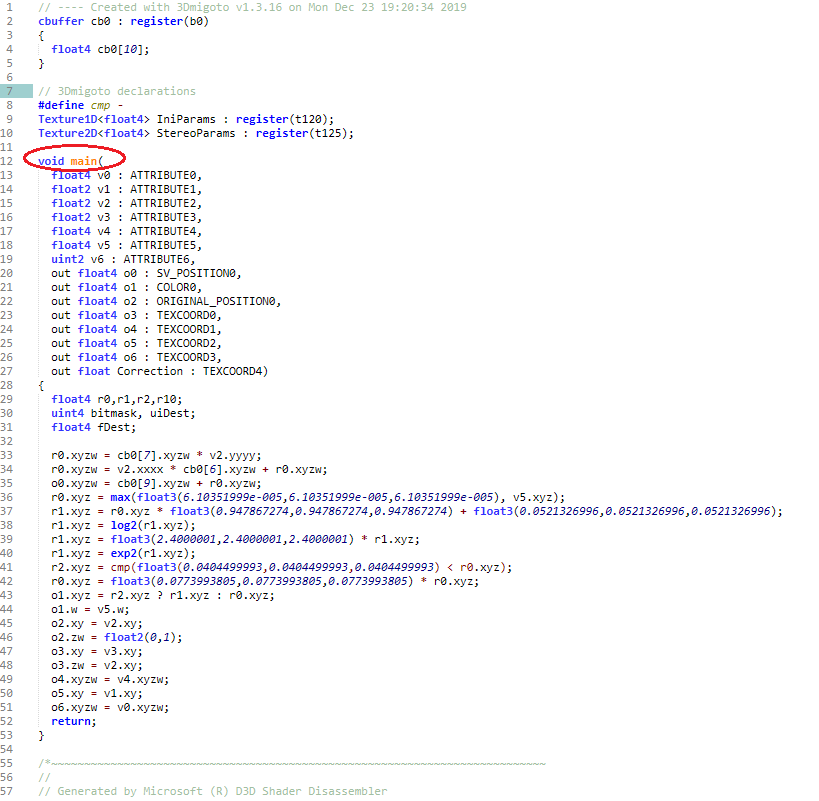
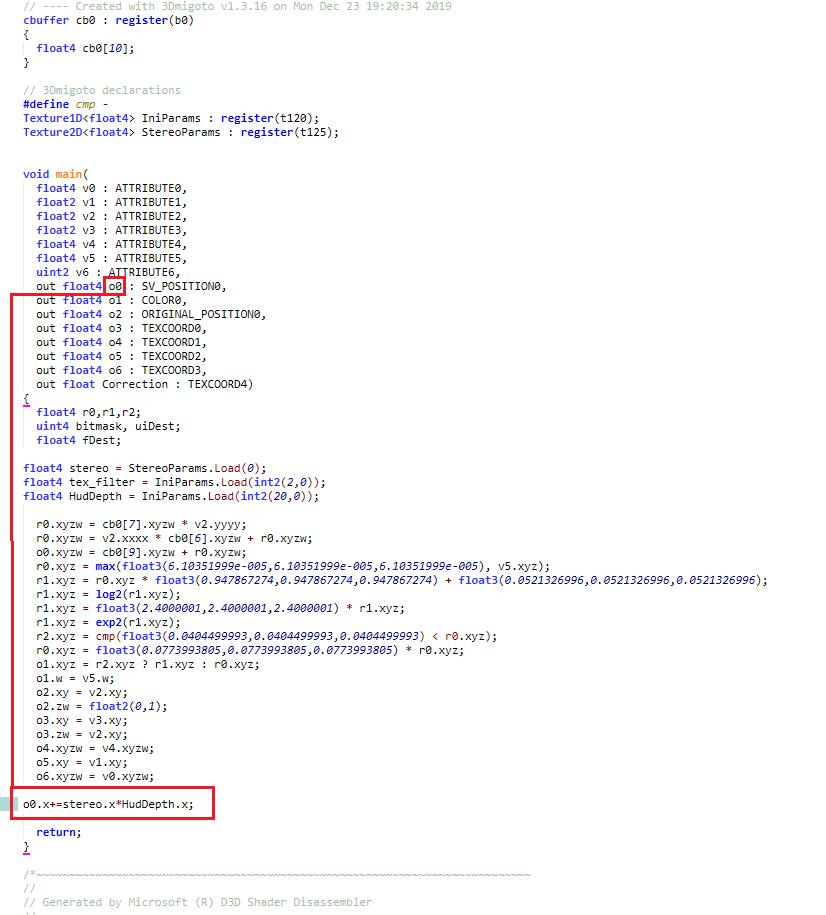
- The output register which is responsible for the shader position can be recognized by the following lettering "SV_Position0".
- In this example this is "o0" (Line: out float4 o0 : SV_Position0,)
- Please remember the register name (o0 in the example) for later!
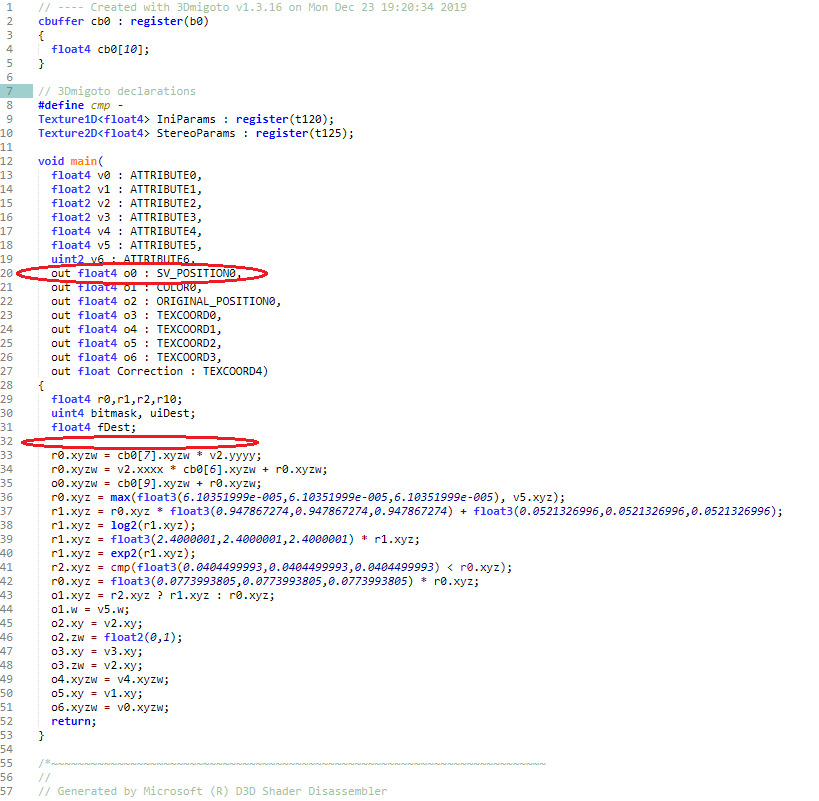
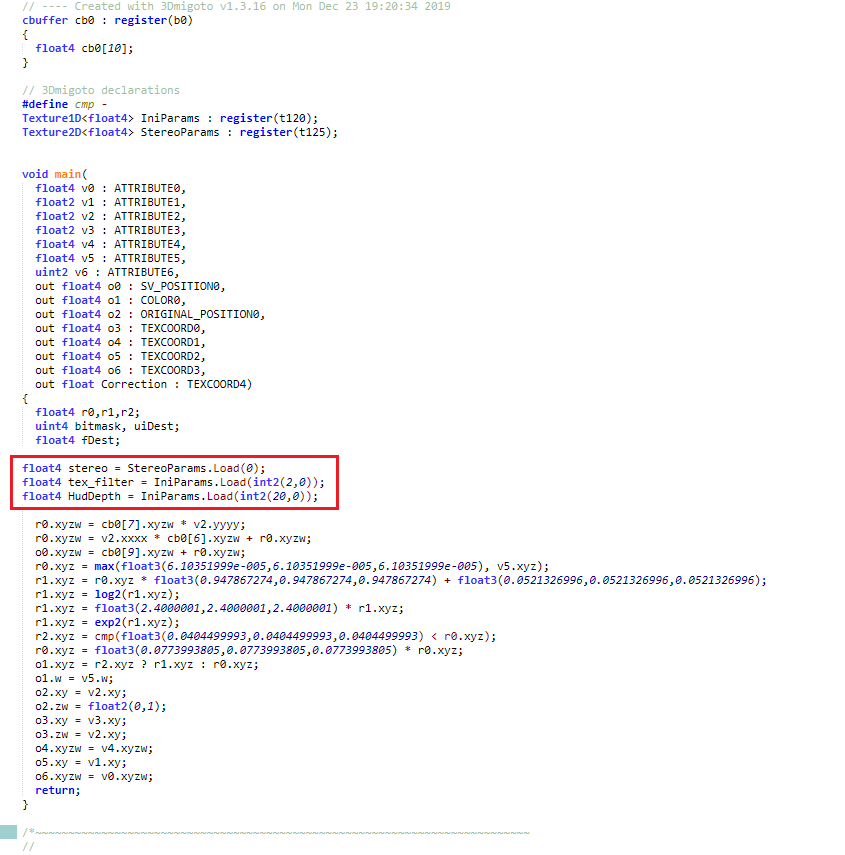
- NOW just look for the line "float4 fDest;" (without "").
- After this line there is an empty line before further instructions appear in the shader.
- Example:
- Click in this blank line and insert the following here:
Code: Select all
float4 stereo = StereoParams.Load(0);
float4 HudDepth = IniParams.Load(int2(20,0));
float4 texfilter = IniParams.Load(int2(2,0));
- add the following code above the return line, the last line of the HLSL shader
- NOTE: The o0 in this example can also be o1 or o2 or any other value, as written above: The output register which is responsible for the shader position can be recognized by the following lettering "SV_Position0".
Code: Select all
o0.x+=stereo.x*HudDepth.x;
5. Modify d3dx.ini
- open d3dx.ini
- search for the constants section "[Constants]"
- Example:

- scroll down a bit, the next section is called [hunting]
- ABOVE this, means at the end of the constants section, enter this, you can also set hunting=0 here
- NOTE: "Key =" cycles the row forwards, "Back =" cycle the values backwards. You dont need the "Back =" here ifyou dont want it. You can use other keys, a complete list is here: http://www.kbdedit.com/manual/low_level_vk_list.html
Code: Select all
x20=0.05

[Key_HUDandUIDepth]
Key = VK_MULTIPLY
Back = VK_DIVIDE
x20 = 0.1, 0.3, 0.4, 0.5, -0.5, -0.4, -0.3, -0.2, -0.1, 0.2, 0.0
type = cycle
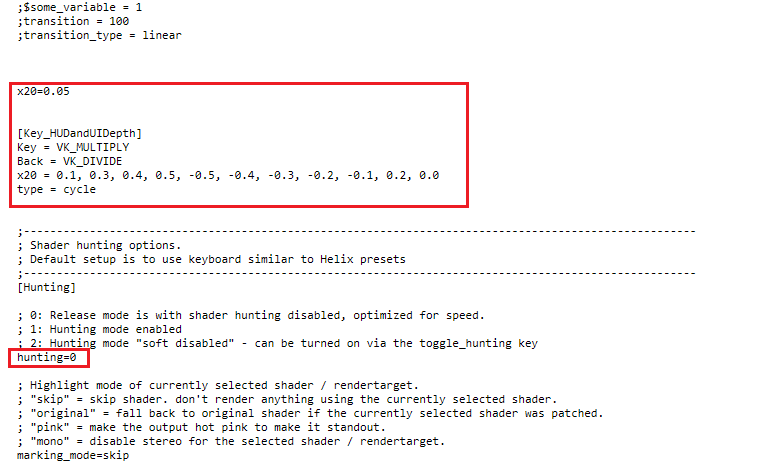
- you can now start the game again
- NOTE: FOR THIS example, the game will start with 5 % HUD/UI depth as default
- the HUD-Depth can be cycled between -50 % (means poput of the screen) and +50 % (mens pop into the screen) with NUMPAD key / and *
- NOTE: If you need more or other percantates for the HUD-UI depth, you are free to change or add values here. possible ranges are from -1.0 to 1.0
-----------------------------------------------------------------------------------------------------------------------------------------------------------------------------------------------------------
2. Middle-HUD Depth Fix
~~~~~~~~~~~~~~~~~~~~~~~~~
This section guides you HOW-TO move the MIDDLE part of HUD/UI of a game into depth. This can be used for crosshair for example that may needs anther depth than the rest of the HUD. Often games will NOT have a shader that ONLY draws crosshair, so this is simple and not much more complicated than the first section from above to give you a chance to add some more depth to a shader that also draws rosshair, as well as other HUD/UI related stuff, like approx. 70 % of the games out there. NOTE: If you have a game that has a single standalone shader for the crosshair, this is also working!
1. Exit the game
- Make sure the game is not started
2. Activate Shader Hunting
- Open d3dx.ini in the directory where you have installed the a fix OR 3DMigoto in a txt editor or in notepad
- Search for "hunting=0" (without "") ==> NOTE: May be its called "hunting = 0"
-- NOTE: In the UNITY-UNIVERSAL-FIX from DHR its is "hunting=2"
- Change it to "hunting=1" (without "")
- Example:
- Save the file
- Start the game.
3. Shader Hunting
- In game, you should now see some green text ath te bottom and the top of the screen
- Example:
- Use NUMPAD5 to cycle through the vertex shaders until the HUD/UI effect disappears
-- NOTE: BE AWARE: ONLY the HUD/UI should be disabled, NOTHING MORE! Otherwhise its the wrong shader in 99% if the cases! (Or its more complicated to fix the HUD that i will not explain here ^^)
-- NOTE: Often you miss a shader because of the cycling speed and its only OFF for a short time and the effect comes back to when the next one is switched through. You can switch off the previously switched off vertex shader with the NUMPAD4 key.
--NOTE: Often HUD/UI consists of more than only one shader/element, you need to hunt those step by step and fix any of the hunted shaders by its own BUT: You can hunt this here and do not need to exit the game and fix all the hunted shaders later together
- Save the vertex shader THAT DISABLES YOUR HUD/UI-ELEMENT by pressing the NUMPAD6 key
- You will get a green message that the shader is saved.
-- NOTE: If there is a orange message that the shader compiling was wrong, you CANNOT use this tutorial to fix THIS HUD/UI-shader!
- exit the game
4. Modify Hunted Shader
- Enter ShaderFixes folder in your game directory
- Sort by latest
- Your just saved shaders should be appear at the top
-- NOTE: You may have .JPS files here, you can delete those
- Saved Vertex-Shaders should be called like this: 4570126e312f169d7-vs_replace.txt (4570126e312f169d7 <-- is random)
- Open the "XXXXXXXXXXXXXXXXX-vs_replace.txt" in a txt-editor, I SUGGEST Sublime Text 3 with HLSL plugin (https://packagecontrol.io/packages/Shad ... HLSL%20Cg)
- Just search for "void main" (without ""), here you can see all input and output registers listed below each other. Depending on the shader, the list can be longer or shorter.
- Example:
- The output register which is responsible for the shader position can be recognized by the following lettering "SV_Position0".
- In this example this is "o0" (Line: out float4 o0 : SV_Position0,)
- Please remember the register name (o0 in the example) for later!
- NOW just look for the line "float4 fDest;" (without "").
- After this line there is an empty line before further instructions appear in the shader.
- Example:
- Click in this blank line and insert the following here:
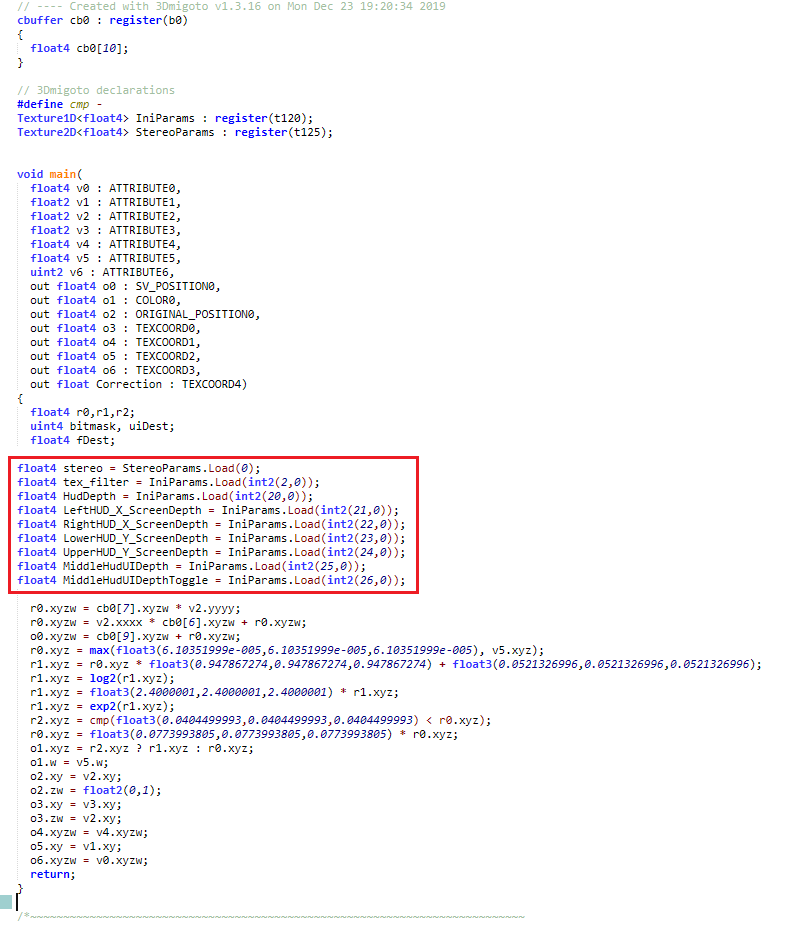
Code: Select all
float4 stereo = StereoParams.Load(0);
float4 tex_filter = IniParams.Load(int2(2,0));
float4 HudDepth = IniParams.Load(int2(20,0));
float4 LeftHUD_X_ScreenDepth = IniParams.Load(int2(21,0));
float4 RightHUD_X_ScreenDepth = IniParams.Load(int2(22,0));
float4 LowerHUD_Y_ScreenDepth = IniParams.Load(int2(23,0));
float4 UpperHUD_Y_ScreenDepth = IniParams.Load(int2(24,0));
float4 MiddleHudUIDepth = IniParams.Load(int2(25,0));
float4 MiddleHudUIDepthToggle = IniParams.Load(int2(26,0));
- add the following code above the return line, the last line of the HLSL shader
- NOTE: The o0 in this example can also be o1 or o2 or any other value, as written above: The output register which is responsible for the shader position can be recognized by the following lettering "SV_Position0".
Code: Select all
if(MiddleHudUIDepthToggle.x==1.0)
{
if(o0.y > -LowerHUD_Y_ScreenDepth.x && o0.y < UpperHUD_Y_ScreenDepth.x && o0.x > -LeftHUD_X_ScreenDepth.x && o0.x < RightHUD_X_ScreenDepth.x)
{
o0.x+=stereo.x*MiddleHudUIDepth.x;
}
else
{
o0.x+=stereo.x*HudDepth.x;
}
}
else
{
o0.x+=stereo.x*HudDepth.x;
}
5. Modify d3dx.ini
- open d3dx.ini
- search for the constants section "[Constants]"
- Example:
- scroll down a bit, the next section is called [hunting]
- ABOVE this, means at the end of the constants section, enter this, you can also set hunting=0 here
- NOTE: "Key =" cycles the row forwards, "Back =" cycle the values backwards. You dont need the "Back =" here ifyou dont want it. You can use other keys, a complete list is here:
http://www.kbdedit.com/manual/low_level_vk_list.html
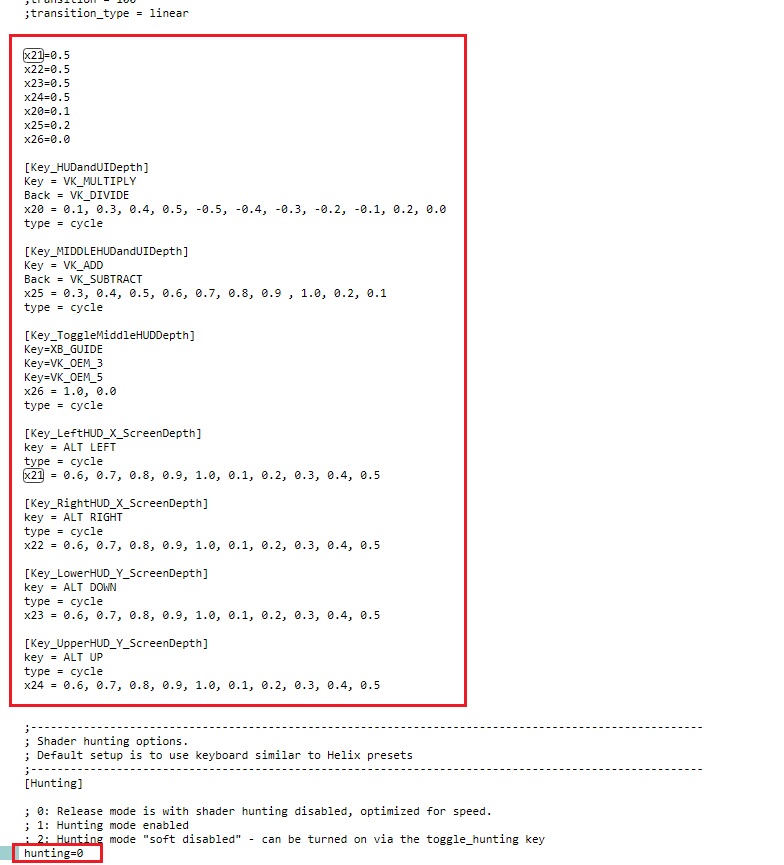
Code: Select all
x21=0.5
x22=0.5
x23=0.5
x24=0.5
x20=0.1
x25=0.2
x26=0.0

[Key_HUDandUIDepth]
Key = VK_MULTIPLY
Back = VK_DIVIDE
x20 = 0.1, 0.3, 0.4, 0.5, -0.5, -0.4, -0.3, -0.2, -0.1, 0.2, 0.0
type = cycle

[Key_MIDDLEHUDandUIDepth]
Key = VK_ADD
Back = VK_SUBTRACT
x25 = 0.3, 0.4, 0.5, 0.6, 0.7, 0.8, 0.9 , 1.0, 0.2, 0.1
type = cycle

[Key_ToggleMiddleHUDDepth]
Key=XB_GUIDE
Key=VK_OEM_3
Key=VK_OEM_5
x26 = 1.0, 0.0
type = cycle

[Key_LeftHUD_X_ScreenDepth]
key = ALT LEFT
type = cycle
x21 = 0.6, 0.7, 0.8, 0.9, 1.0, 0.1, 0.2, 0.3, 0.4, 0.5

[Key_RightHUD_X_ScreenDepth]
key = ALT RIGHT
type = cycle
x22 = 0.6, 0.7, 0.8, 0.9, 1.0, 0.1, 0.2, 0.3, 0.4, 0.5

[Key_LowerHUD_Y_ScreenDepth]
key = ALT DOWN
type = cycle
x23 = 0.6, 0.7, 0.8, 0.9, 1.0, 0.1, 0.2, 0.3, 0.4, 0.5

[Key_UpperHUD_Y_ScreenDepth]
key = ALT UP
type = cycle
x24 = 0.6, 0.7, 0.8, 0.9, 1.0, 0.1, 0.2, 0.3, 0.4, 0.5
- you can now start the game again
- the HUD-Depth can be cycled between -50 % (means poput of the screen) and +50 % (mens pop into the screen) with NUMPAD key / and *
- NOTE: If you need more or other percantates for the HUD-UI depth, you are free to change or add values here. possible ranges are from -1.0 to 1.0
- MIDDLE-HUD/UI depth adjustment can be toggled on/off by XB_GUIDE or TILDE-KEY
- "ALT+LEFT" / "ALT+RIGHT" / "ALT+UP" / "ALT+DOWN" defines the boarder in % for which the HUD/UI in the middle will be more in depth than the rest of the HUD/UI.
- FOR THIS example, the start is at 50 % if the left/upper/lower/right screen, it can be adjusted individually by the keys ALT + UP/DOWN/LEFT/RIGHT individually.
- FOR THIS example, the game will start with 5 % HUD/UI depth as default
- FOR THIS example, the game will start with 10 % depth for the MIDDLE-HUD/UI
-----------------------------------------------------------------------------------------------------------------------------------------------------------------------------------------------------------
The tutorial is now completed, please let me know if you have successfully used it or if there are any issues you cannot solve or that are not well explained. The other things of HUD/UI fixing are too hard to tell/put into a tutorial.
As you can see, the more options you have and the more things you want to perform, the more complicated the things will get. It lasts hrs/days/weeks/months, may be years to get used to behind all the things that are possibel/can be done with shaders. This 2 Tutorials are only the basics and behind many HUD/UI fixes there stands much more work you may not see, because the game-HUD works cool/perfect or is bettet than screen depth.
Please keep in mind that behind a GAME-FIX is much more than the work you can now do here by your own with the help of this guide and please keep in mind that this is NOT working so easy for all the games out there.
I am writing this epilogue, to bring back things in your mind or put the things in your mind, that 3D-Shader hacking for those who like/love 3D should be much more worth than a simple downlaod without any contributon to all the peoples who are behind 3D-VISION-FIXES.
CHEERS. Losti.