Home built Omni Directional treadmill
Posted: Wed Jul 03, 2013 6:34 am
Hey guys,
I'll start off with a bit of a background.
I have always been intrigued by virtual reality but the technology and the gaming industry were always worlds apart.
There was hardly any options and with what there was available it didn't seem to capture my imagination.
Last year I viewed a video about the ultimate BF3 simulator (http://www.youtube.com/watch?v=eg8Bh5iI2WY)
and was amazed by the immersion and set about to find a way to bring it back home. Alas this was not to be so.
After much pondering I came to the conclusion that the picture being beamed onto the wall was going to be the most
difficult part to re produce. It seemed to me that it was not worth the effort because of how limited you were in looking
around the environment and I felt any immersion would be lost once the initial novelty of the system wore off.
I looked at many head mounted displays etc but nothing seemed to tick all the right boxes so I gave up.
To me, a newcomer to the VR scene, a whole world has been opened up with the oculus rift. Even in it's infancy
it has generated soo much buzz for the non VR community that I simply had to investigate it further. I hadn't heard of the
oculus kickstarter campaign and was a bit annoyed I missed the initial backing orders. I know the resolution is poor and the
screen door effect does not bother me in the least, your brain can teach you to ignore such imperfections.
So, now to the project. The last of the devices for fully immersible virtual environments is a way to move around your environment
without actually moving (or as little movement as possible). I'd searched around the net for an easy, affordable solution and found a
stack of them. But yet again none of them was to me, worth the effort. I've seen the virtuix and similar but they still lack "natural movement"
that I have been looking for.
With no other options and no foreseeable consumer omni treadmill in sight I decided that I will build one in my shed. The design is going to follow
the omni directional treadmill created by MSE as seen in the BF3 simulator. I picked that one and not cyberwalk because of complexity and cost.
Whith an estimated cost of about $5000 AUD it would be significantly cheaper than the cyberwalk. That is mostly just materials cost. The bearings alone are going to total
$2500 . That does not bother me though as this omni is going to take a while to build so the costs are going to be projected over quite a period of time.
After all who else in the world has one of these in their backyard? I'd love to see one if anyone has a link!
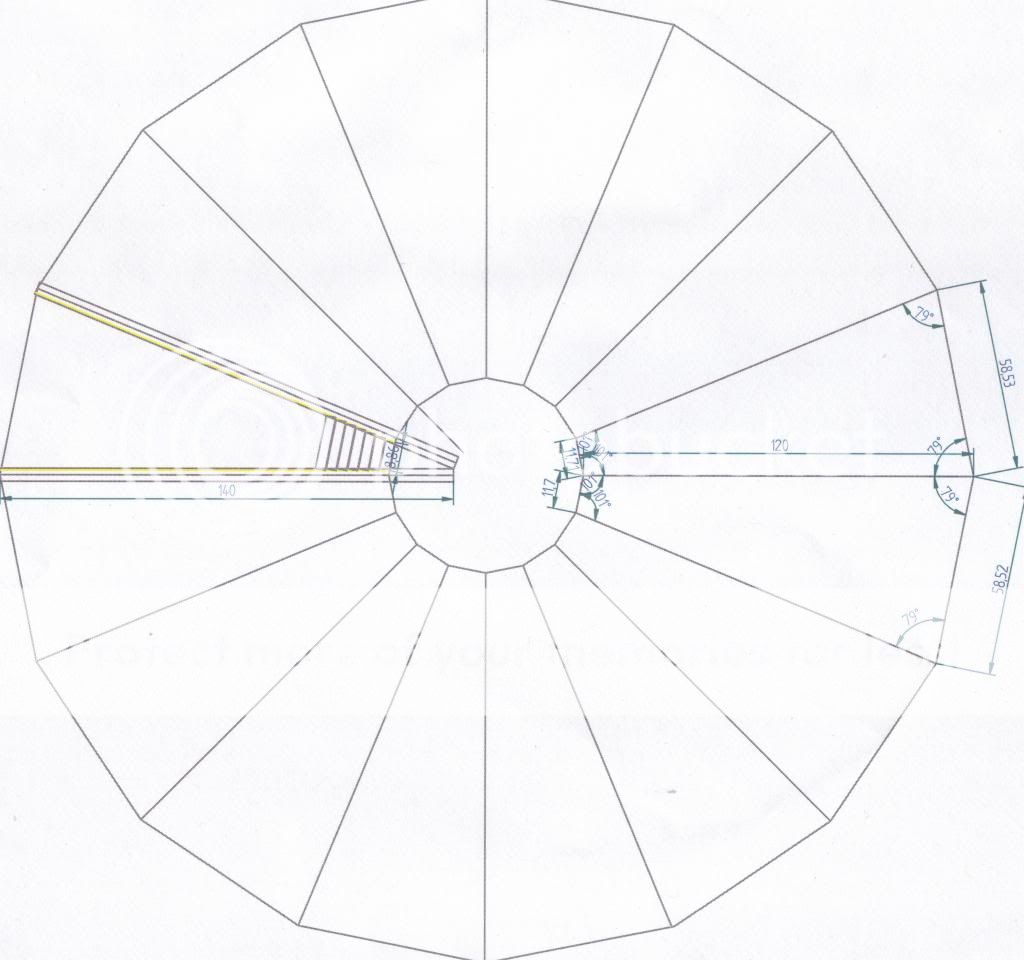
So at the moment I am in the design/plan and test phase. I have drawn a quick sketch sized to fit in my 3.5 meter wide shed. Total outside diameter is 3 meters.
I used a free version of solid edge 2d to draw the sketch. The sketch shows some simple but not definitive dimensions, 16 treadmill roller segments with one segment
showing a few dimensions of roller sizing. The center piece will be a solid platform for the user to stand on with the scetch showing two of the support beams drawn in.
The sketch is no where near complete but it at least gives me an idea and shows any possible problems with design.
Please feel free to critique and advise on any aspect during the design phase as many eyes are better than two!
Because I hate paperwork I decided to get my hands dirty and put together roller mk1!
The rollers are going to comprise of a center support shaft that the rollers will spin around. The bearings will sit on this shaft held in place by collets secured to the shaft on the inner side
of the bearings (the two nuts on the threaded rod in pic1) and a thin spacer on the outside of the bearing (the nut on the threaded rod pic2).


The hardest part with the roller is finding a bearing/roller combo that fits. With standard bearing sizes and standard tube sizes I have very limited options. I have chosen a 32mm tube 1.6mm thick
and mated it with a 28mm bearing. This leaves a gap of 0.4mm on the outside of the bearing. I plan on using a thin plastic sleeve to make up for the space left over held in with an epoxy resin.
This quick test rolelr has proven that material available locally to me can produce a very nice and tight solution. In the pic I have used threaded rod because it was just easy to use and I had it
laying around.
My next goal is to create one section of this treadmill and actually have it powered.
I'm loving this project already!
I'll start off with a bit of a background.
I have always been intrigued by virtual reality but the technology and the gaming industry were always worlds apart.
There was hardly any options and with what there was available it didn't seem to capture my imagination.
Last year I viewed a video about the ultimate BF3 simulator (http://www.youtube.com/watch?v=eg8Bh5iI2WY)
and was amazed by the immersion and set about to find a way to bring it back home. Alas this was not to be so.
After much pondering I came to the conclusion that the picture being beamed onto the wall was going to be the most
difficult part to re produce. It seemed to me that it was not worth the effort because of how limited you were in looking
around the environment and I felt any immersion would be lost once the initial novelty of the system wore off.
I looked at many head mounted displays etc but nothing seemed to tick all the right boxes so I gave up.
To me, a newcomer to the VR scene, a whole world has been opened up with the oculus rift. Even in it's infancy
it has generated soo much buzz for the non VR community that I simply had to investigate it further. I hadn't heard of the
oculus kickstarter campaign and was a bit annoyed I missed the initial backing orders. I know the resolution is poor and the
screen door effect does not bother me in the least, your brain can teach you to ignore such imperfections.
So, now to the project. The last of the devices for fully immersible virtual environments is a way to move around your environment
without actually moving (or as little movement as possible). I'd searched around the net for an easy, affordable solution and found a
stack of them. But yet again none of them was to me, worth the effort. I've seen the virtuix and similar but they still lack "natural movement"
that I have been looking for.
With no other options and no foreseeable consumer omni treadmill in sight I decided that I will build one in my shed. The design is going to follow
the omni directional treadmill created by MSE as seen in the BF3 simulator. I picked that one and not cyberwalk because of complexity and cost.
Whith an estimated cost of about $5000 AUD it would be significantly cheaper than the cyberwalk. That is mostly just materials cost. The bearings alone are going to total
$2500
After all who else in the world has one of these in their backyard? I'd love to see one if anyone has a link!
So at the moment I am in the design/plan and test phase. I have drawn a quick sketch sized to fit in my 3.5 meter wide shed. Total outside diameter is 3 meters.
I used a free version of solid edge 2d to draw the sketch. The sketch shows some simple but not definitive dimensions, 16 treadmill roller segments with one segment
showing a few dimensions of roller sizing. The center piece will be a solid platform for the user to stand on with the scetch showing two of the support beams drawn in.
The sketch is no where near complete but it at least gives me an idea and shows any possible problems with design.

Please feel free to critique and advise on any aspect during the design phase as many eyes are better than two!
Because I hate paperwork I decided to get my hands dirty and put together roller mk1!
The rollers are going to comprise of a center support shaft that the rollers will spin around. The bearings will sit on this shaft held in place by collets secured to the shaft on the inner side
of the bearings (the two nuts on the threaded rod in pic1) and a thin spacer on the outside of the bearing (the nut on the threaded rod pic2).


The hardest part with the roller is finding a bearing/roller combo that fits. With standard bearing sizes and standard tube sizes I have very limited options. I have chosen a 32mm tube 1.6mm thick
and mated it with a 28mm bearing. This leaves a gap of 0.4mm on the outside of the bearing. I plan on using a thin plastic sleeve to make up for the space left over held in with an epoxy resin.
This quick test rolelr has proven that material available locally to me can produce a very nice and tight solution. In the pic I have used threaded rod because it was just easy to use and I had it
laying around.
My next goal is to create one section of this treadmill and actually have it powered.
I'm loving this project already!


