DIY Oculus Rift - schematics, instructions and build pics!

Post Reply
geekmaster
Petrif-Eyed
Posts: 2708
Joined: Sat Sep 01, 2012 10:47 pm

Re: DIY Oculus Rift - schematics, instructions and build pic

Post by geekmaster »

MaterialDefender wrote:You make me really curious... Since I'll disassemble my build anyway to put in new lenses, I guess I will try to find some good fresnels too for testing.
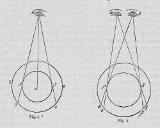
To get maximum FoV, the fresnels are trimmed to fit under my eyebrow ridges, and against the side of my nose. A pair of lenses actually touch together on the upper nose bridge (but below the center of the eyebrow ridge).

The images are stretched far enough the even with full FoV there is no visibility of the other half of the screen (but the outer corners are outside the FoV). When inside a game, it really is an amazing experience. Like I said, this arrangement provides a "supernatural" (beyond natural) FoV. Cutting down aspheric lenses may not provide this experience. I think it is the stacking of the outer 1/3 of 6-inch lenses with the center 1/3 that contributes to the extraordinary horizontal FoV.

Using aspherics may provide a better quality image, but at a reduced FoV. Immersion is more FoV dependent than image quality dependent, in my experience.

I have yet to try a pair of lens stacks for a stereoscopic test, but I do not see why it should be any problem.

Beware that the lens stacks must be in the "sweet spot" (try adjusting their position) or the result will be unsatisfactory. My fresnel lens stack may be optimized for my near-sighted vision, so YMMV.

If others try this, please report back...
geekmaster
Petrif-Eyed
Posts: 2708
Joined: Sat Sep 01, 2012 10:47 pm

Re: DIY Oculus Rift - schematics, instructions and build pic

Post by geekmaster »

For an understanding of why these stacked fresnel elements work like this, look up information on "eccentric fresnel". I am using one outer 1/3 of a 6-in lens to stretch the inner side of the image behind my nose. The other outer 1/3 stretches the outer edge of the FoV so all you see is pixels even when painfully rolling your eyes to the outer limits. And the inner 1/3 adds to that, and also stretches the vertical FoV above my eyebrows, and below my cheeks. It is like slicing smaller lenses from the outer edges of a large 6-inch lens, resulting in a large sidewayes stretching of the FoV.
PalmerTech
Golden Eyed Wiseman! (or woman!)
Posts: 1644
Joined: Fri Aug 21, 2009 9:06 pm

Re: DIY Oculus Rift - schematics, instructions and build pic

Post by PalmerTech »

Some pictures would be great! I have been messing around with things like this, but I want to test your actual setup. I have the fresnel lenses you used on order, should be here soon.
geekmaster
Petrif-Eyed
Posts: 2708
Joined: Sat Sep 01, 2012 10:47 pm

Re: DIY Oculus Rift - schematics, instructions and build pic

Post by geekmaster »

PalmerTech wrote:Some pictures would be great! I have been messing around with things like this, but I want to test your actual setup. I have the fresnel lenses you used on order, should be here soon.
Cool! I need to find my camera battery charger now...

EDIT: Found it. Charging...
3dvison
Diamond Eyed Freakazoid!
Posts: 718
Joined: Sun Oct 24, 2010 7:25 pm

Re: DIY Oculus Rift - schematics, instructions and build pic

Post by 3dvison »

geekmaster wrote:
PalmerTech wrote:Some pictures would be great! I have been messing around with things like this, but I want to test your actual setup. I have the fresnel lenses you used on order, should be here soon.
Cool! I need to find my camera battery charger now...

EDIT: Found it. Charging...
That would be great, because I am not sure where the cut edges go ? Are the three stacked one on top of the other or are they butted edge to edge or even if they are shifted a little left and right, can't you then see the edges of the center fresnel ?
geekmaster
Petrif-Eyed
Posts: 2708
Joined: Sat Sep 01, 2012 10:47 pm

Re: DIY Oculus Rift - schematics, instructions and build pic

Post by geekmaster »

3dvison wrote:
geekmaster wrote:
PalmerTech wrote:Some pictures would be great! I have been messing around with things like this, but I want to test your actual setup. I have the fresnel lenses you used on order, should be here soon.
Cool! I need to find my camera battery charger now...

EDIT: Found it. Charging...
That would be great, because I am not sure where the cut edges go ? Are the three stacked one on top of the other or are they butted edge to edge or even if they are shifted a little left and right, can't you then see the edges of the center fresnel ?
As I mentioned earlier, I cut the 6-inch wide lens into 3 2-inch wide lenses then stacked them face-to-face with the ridges all toward the eye. I trimmed the edge against my nose and eyebrow so it all touches the skin of my nose, under my eyebrow, and my cheek.

I just looked into a mirror while holding my lens stack to my face and I see that it touchs the corner of my nose where it joins the cheek above my lip.

My battery is not done charging, but it may be enough to take a photo... I will try that.

EDIT: Okay, the camera works. Now, where is my lens stack? I was just playing with it a half hour ago. I cannot find it anywhere! Getting old sucks! Time to go to the dollar store and get some more fresnel magnifiers. I need a lens stack for the other eye anyway, so now I need to make two sets... :(
3dvison
Diamond Eyed Freakazoid!
Posts: 718
Joined: Sun Oct 24, 2010 7:25 pm

Re: DIY Oculus Rift - schematics, instructions and build pic

Post by 3dvison »

geekmaster wrote:As I mentioned earlier, I cut the 6-inch wide lens into 3 2-inch wide lenses then stacked them face-to-face with the ridges all toward the eye.:(
Thanks, I read your post but for some reason I thought you had the right and left lenses feathered/shifted outward left/right. But they are not, they are just stacked one on top of the other.
Last edited by 3dvison on Mon Jan 28, 2013 5:28 pm, edited 1 time in total.
User avatar
Fredz
Petrif-Eyed
Posts: 2255
Joined: Sat Jan 09, 2010 2:06 pm
Location: Perpignan, France
Contact:

Re: DIY Oculus Rift - schematics, instructions and build pic

Post by Fredz »

geekmaster wrote:I got the idea from an old "Virtual Reality Construction" book that came with fresnel lenses and a cardboard fold-up frame
This one I guess ? :
6115369086_3052cb0a09_z.jpg
You do not have the required permissions to view the files attached to this post.
geekmaster
Petrif-Eyed
Posts: 2708
Joined: Sat Sep 01, 2012 10:47 pm

Re: DIY Oculus Rift - schematics, instructions and build pic

Post by geekmaster »

Fredz wrote:
geekmaster wrote:I got the idea from an old "Virtual Reality Construction" book that came with fresnel lenses and a cardboard fold-up frame
This one I guess ? :
...
Yes, that is the one that gave me the idea to try this. I still have it, but the lenses fell out of it. They are around somewhere. That tab on top has a red string tied to it (included in the kit), which gets taped on top of the CRT so that you can hang it down over the screen and use it without holding it, or place it on top of the CRT when not using it. It worked fairly well, but you had to lean into it to use it, and you had to size and center your 3D image pair to fit into it.

Those were very coarse pitched fresnel lenses, and the ones I used for this experiment are very fine pitched (so much better image). Also, to get the maximum area of the screen in focus, I am holding them roughly parallel to the screen surface.

I just bought 16 more lenses to play with. I just cut one up and got a couple of photos before my battery was dead again. I lost my original charger while travelling, and this replacement charger takes forever and does not seem to give a full charge... :-(

I have a photo of it held up to my left eye, taken while looking in a mirror, so you can see how it touches the underside of my eyebrow ridge, and the side of my nose down to my cheek, and part of my cheek... I need to stack them together and trim their edge to match the curve now cut into one of them, then take more photos.

Now, I need to charge my camera battery overnight, and I need to find my microSDHC card reader so I can post the photos I have thus far... :-(
3dvison
Diamond Eyed Freakazoid!
Posts: 718
Joined: Sun Oct 24, 2010 7:25 pm

Re: DIY Oculus Rift - schematics, instructions and build pic

Post by 3dvison »

OK, I my be slow on the up take, but this is what seems to work for me, and it may well be what has been said here all along but I just did not understand it.

Found what seems to be very close to the same lenses at Office Depot.
For me using the center portion is what gives the best image. So if you wanted a 2inch dia lens you would start at the 3inch mark which is the center of the 6inch lens and go 1 inch left of the 3inch mark and cut and 1 inch right of the 3inch mark and cut.

So I needed 3 full 6inch lenses to make 1 lens. The lens is made from 3 identical lenes all cut from the center portion of a 6inch fresnel..
geekmaster
Petrif-Eyed
Posts: 2708
Joined: Sat Sep 01, 2012 10:47 pm

Re: DIY Oculus Rift - schematics, instructions and build pic

Post by geekmaster »

3dvison wrote:OK, I my be slow on the up take, but this is what seems to work for me, and it may well be what has been said here all along but I just did not understand it.

Found what seems to be very close to the same lenses at Office Depot.
For me using the center portion is what gives the best image. So if you wanted a 2inch dia lens you would start at the 3inch mark which is the center of the 6inch lens and go 1 inch left of the 3inch mark and cut and 1 inch right of the 3inch mark and cut.

So I needed 3 full 6inch lenses to make 1 lens. The lens is made from 3 identical lenes all cut from the center portion of the larger 6inch fresnel..
I will have to try that. I started with one fresnel magnifier. It is cut at the 2 and 4 inch marks, just like yours. It works well enough, but perhaps your stack of 3 centers would be even better...

Using the eccentric (off-center) edges requires keeping the ridges toward the eye. Otherwise the image distortion is not correct to compensate for the Rift-adjusted images.

With eccentric lense, the image can stretch beyond normal facial occlusions such as the nose. It that the same for only using lens centers?
3dvison
Diamond Eyed Freakazoid!
Posts: 718
Joined: Sun Oct 24, 2010 7:25 pm

Re: DIY Oculus Rift - schematics, instructions and build pic

Post by 3dvison »

Ah Ha,
My stack has the ridges facing away from the eye.
I was testing it with pre-warped Rift photos.

The advantage of this stack over a regular round lens, is the rectangular shape, you dont feel like you are looking through a port hole.
geekmaster
Petrif-Eyed
Posts: 2708
Joined: Sat Sep 01, 2012 10:47 pm

Re: DIY Oculus Rift - schematics, instructions and build pic

Post by geekmaster »

3dvison wrote:Ah Ha,
My stack has the ridges facing away from the eye.
I was testing it with pre-warped Rift photos.

The advantage of this stack over a regular round lens, is the rectangular shape, you dont feel like you are looking through a port hole.
Try the eccentric (edge) portions in your stack, with the ridges facing toward your eye. Be sure to cut notches for your nose and eyebrow ridge in the inner edges (but not too much or you lose too much of the outer edge). I was actually holding mine below the eyebrow inward toward the eye. The key to stretching half of a 7-inch screen to full FoV is getting it very close to the eye, which requires trimming a little to fit the nose and inner eyebrow ridge...

Because the lens portion of my magnifiers is a bit larger than 6-inches, my elements were about 1/8-inch wider than 2-inches.

I still think the eccentric portions from the outside of the 6-inch lens are important to get the full FoV that I am describing. One side stretches the inner image beyond the nose with none of the other image visible (and not even the nose visible). The other side stretches the outer image to the edge of the lens stack without showing the left border of the video image. The center part gets rid of the top and bottom margins...

I have not tried 3 centers yet. I bought 16 more magnifiers so I will try various arrangements to see if I can improve on it.
marwood82
One Eyed Hopeful
Posts: 3
Joined: Mon Jan 07, 2013 9:36 am

Re: DIY Oculus Rift - schematics, instructions and build pic

Post by marwood82 »

Hi,

bit of a noob question, but i couldn't see it mentioned in this thread,(i did look so sorry if i've missed it this threads gotten quite big!)

i've got the HV056WX1-100 display and the NT68674.5A controller board which i think others here are using.
however mine didn't come with a datasheet.

what voltage power supply are people using with this board and screen combo? (my variable dc power adapter goes from 3.5v to 12v but i don't want burn anything out)
German
Binocular Vision CONFIRMED!
Posts: 209
Joined: Tue Nov 23, 2010 5:18 pm

Re: DIY Oculus Rift - schematics, instructions and build pic

Post by German »

Just wanted to say thanks to all you guys who posted about their builds in this thread. The information was very helpful in getting my DIY up and running. Special thanks to rfurlan for the excellent template that got me halfway to making my own. Also, thanks to djdevin for posting that monitor config and the original link to the all-in-one 5.6" monitor on ebay. Of course, thank you Palmer for everything. :)
User avatar
Namielus
Certif-Eyable!
Posts: 957
Joined: Thu Aug 02, 2012 8:49 am
Location: Norway
Contact:

Re: DIY Oculus Rift - schematics, instructions and build pic

Post by Namielus »

I order a 7" display from Chinatobby on ebay
http://www.ebay.co.uk/itm/181000536502? ... 1497.l2649

and the lenses Palmer recommended

http://www.ebay.co.uk/itm/5x-pocket-lou ... 3a79987a19
5x pocket loupe magnifier with Aspheric Lens
Also got a cheap generic ski-goggle.
I have bought a sheet of carbon fibre clothing, epoxy and expanded polysterene plates that I will cut to shape.

EPS is really easy to shape, and I will try to shape it to fit the frame of the goggles and glue it to them.
Then I will cut holes for the lenses and carve the foam out until the screen is in the right place.
(using a wood representation of the display)
Finally, I will wrap the carbon fibre sheet around the foam and the goggle frame (maybe glue it with some eps-friendly glue) I will also make sure I wrap some carbon fibre into the holes that the lenses will sit in
and then laze it all with epoxy.
When the epoxy cures it will be rigid and strong, and I can melt the foam away with ethanol or similar.
What remains then will be the empty carbon fibre shell, and I will insert the display in that slot.

This will reduce the weight of the HMD as much as possible on my end. Maybe I can make a longer cable so that the controller board wont have to be mounted inside the hmd.
Last edited by Namielus on Thu Jan 31, 2013 9:21 am, edited 2 times in total.
Riftoholic

My precious 6 month project the Oculus Virtual Lounge:
Image
If you help me in any way I will be forever grateful.
spontaniusf
One Eyed Hopeful
Posts: 1
Joined: Wed Jan 16, 2013 2:35 pm

Re: DIY Oculus Rift - schematics, instructions and build pic

Post by spontaniusf »

marwood82 wrote:Hi,

bit of a noob question, but i couldn't see it mentioned in this thread,(i did look so sorry if i've missed it this threads gotten quite big!)

i've got the HV056WX1-100 display and the NT68674.5A controller board which i think others here are using.
however mine didn't come with a datasheet.

what voltage power supply are people using with this board and screen combo? (my variable dc power adapter goes from 3.5v to 12v but i don't want burn anything out)
12V is what it takes. I would be sure you can supply it with at least 2A at that voltage also. I got a 12v 6A supply from amazon, so I don't know what its really drawing, but you should be more than safe with 2A.
Edit: I just pulled up the first google result for the control board data sheet: https://s3.amazonaws.com/rfurlan/HMZ/controller.pdf
marwood82
One Eyed Hopeful
Posts: 3
Joined: Mon Jan 07, 2013 9:36 am

Re: DIY Oculus Rift - schematics, instructions and build pic

Post by marwood82 »

spontaniusf wrote:
12V is what it takes. I would be sure you can supply it with at least 2A at that voltage also. I got a 12v 6A supply from amazon, so I don't know what its really drawing, but you should be more than safe with 2A.
Edit: I just pulled up the first google result for the control board data sheet: https://s3.amazonaws.com/rfurlan/HMZ/controller.pdf
yeah, i saw that but what got me a bit confused was that the power supply part in section 6 has 2 sections where it mentions 12v and 12v/5v

and a lot of the rest of the voltages in the document mentioned are around 5v.

my adapter can support 2A at 12V so it should be ok.

thanks for the info!
User avatar
Fredz
Petrif-Eyed
Posts: 2255
Joined: Sat Jan 09, 2010 2:06 pm
Location: Perpignan, France
Contact:

Re: DIY Oculus Rift - schematics, instructions and build pic

Post by Fredz »

marwood82 wrote:what voltage power supply are people using with this board and screen combo? (my variable dc power adapter goes from 3.5v to 12v but i don't want burn anything out)
You can find the specs of the one I use here (+ polarity inside) :
http://www.mtbs3d.com/phpbb/viewtopic.p ... 695#p88695
User avatar
Dycus
Binocular Vision CONFIRMED!
Posts: 322
Joined: Wed Aug 15, 2012 1:38 pm
Contact:

Re: DIY Oculus Rift - schematics, instructions and build pic

Post by Dycus »

Use 9v - it works just the same, and the regulators and chips don't get as hot. But 12v works fine too.
User avatar
djdevin
Two Eyed Hopeful
Posts: 55
Joined: Wed Oct 17, 2012 1:10 pm
Location: Philadelphia, USA

Re: DIY Oculus Rift - schematics, instructions and build pic

Post by djdevin »

German wrote:Just wanted to say thanks to all you guys who posted about their builds in this thread. The information was very helpful in getting my DIY up and running. Special thanks to rfurlan for the excellent template that got me halfway to making my own. Also, thanks to djdevin for posting that monitor config and the original link to the all-in-one 5.6" monitor on ebay. Of course, thank you Palmer for everything. :)
Glad that worked for you, it was frustrating figuring it out :x

Thanks for your template too, I like the idea of using the back plate as a mount for your straps. Much cleaner approach!
German
Binocular Vision CONFIRMED!
Posts: 209
Joined: Tue Nov 23, 2010 5:18 pm

Re: DIY Oculus Rift - schematics, instructions and build pic

Post by German »

Hey djdevin/Mel, I forgot to ask: Does your unit not allow you to change the brightness/contrast through the menu if you are using the HDMI input?
Zoide
Binocular Vision CONFIRMED!
Posts: 345
Joined: Fri Nov 18, 2011 1:32 am

Re: DIY Oculus Rift - schematics, instructions and build pic

Post by Zoide »

I can't wait for Palmer to buy into geekmaster's Fresnel lens idea so we can have a consumer Rift with superhuman FoV :woot

Palmer: Any news regarding your experiments?
geekmaster
Petrif-Eyed
Posts: 2708
Joined: Sat Sep 01, 2012 10:47 pm

Re: DIY Oculus Rift - schematics, instructions and build pic

Post by geekmaster »

Zoide wrote:I can't wait for Palmer to buy into geekmaster's Fresnel lens idea so we can have a consumer Rift with superhuman FoV :woot

Palmer: Any news regarding your experiments?
My camera battery is charged now, so I should get the photos that Palmer requested posted some time this weekend (I hope). Demands on my time have been just nuts lately...

Hopefully those photos will help Palmer (and others) to duplicate my results. I tried cutting another lens stack to fit my nose more snuggly, but that reduced lens coverage of my outer peripheral vision. Getting (almost) full coverage at the outer edges requires the lens stacks to be positioned just right, so they may not provide total FoV for everybody (depending on facial features).

What I would really like to try is a custom acrylic lens that can duplicate my fresnel lens stack, but with superior image quality (necessary when the Rift gets a higher resolution display).
Spiffy
One Eyed Hopeful
Posts: 6
Joined: Wed Jan 16, 2013 9:40 am

Re: DIY Oculus Rift - schematics, instructions and build pic

Post by Spiffy »

Any one from Australia here?, I ordered The lenses on the 18th and they haven't arrived, as far as i can tell from my tracking number they're still in America, Anyone else had slow shipping times?
Postipate
One Eyed Hopeful
Posts: 14
Joined: Mon Dec 03, 2012 3:49 pm

Re: DIY Oculus Rift - schematics, instructions and build pic

Post by Postipate »

Spiffy wrote:Any one from Australia here?, I ordered The lenses on the 18th and they haven't arrived, as far as i can tell from my tracking number they're still in America, Anyone else had slow shipping times?
For me it was 17 days.
geekmaster
Petrif-Eyed
Posts: 2708
Joined: Sat Sep 01, 2012 10:47 pm

Re: DIY Oculus Rift - schematics, instructions and build pic

Post by geekmaster »

Postipate wrote:
Spiffy wrote:Any one from Australia here?, I ordered The lenses on the 18th and they haven't arrived, as far as i can tell from my tracking number they're still in America, Anyone else had slow shipping times?
For me it was 17 days.
I am in the USA and it still took a couple of weeks for mine to arrive.
fraherd
One Eyed Hopeful
Posts: 47
Joined: Wed Aug 10, 2011 5:28 pm

Re: DIY Oculus Rift - schematics, instructions and build pic

Post by fraherd »

It took me 22 days, the hold up was in the US.... I paid the extra for the better postage too. I just put it down to the time of year (it was over the xmas break)
3D Visualisation Artist
http://www.FraherDesign3D.com.au
Spiffy
One Eyed Hopeful
Posts: 6
Joined: Wed Jan 16, 2013 9:40 am

Re: DIY Oculus Rift - schematics, instructions and build pic

Post by Spiffy »

Ahhh nvm, got them today :D .
ziasquinn
One Eyed Hopeful
Posts: 1
Joined: Wed Feb 06, 2013 9:05 pm

Re: DIY Oculus Rift - schematics, instructions and build pic

Post by ziasquinn »

This might be a dumb question, but how do you set a 7 inch display to behave like a 5.6 inch display?
Zoide
Binocular Vision CONFIRMED!
Posts: 345
Joined: Fri Nov 18, 2011 1:32 am

Re: DIY Oculus Rift - schematics, instructions and build pic

Post by Zoide »

geekmaster wrote:My camera battery is charged now, so I should get the photos that Palmer requested posted some time this weekend (I hope). Demands on my time have been just nuts lately...
Any news? Thanks
3dvison
Diamond Eyed Freakazoid!
Posts: 718
Joined: Sun Oct 24, 2010 7:25 pm

Re: DIY Oculus Rift - schematics, instructions and build pic

Post by 3dvison »

Could those of you with a finished Diy Rift speak about somthing I am wondering about.
That somthing is screen placement and if having it placed dead center is the best place for it.?
The thing is this, when I have the screen placed at dead center, I can just see the top and bottom of the screen picture.
But when the screen is placed just a bit lower than center, I feel more in the VR world.
With it in that lower position, when I look straight ahead,I can seen the top of the screen but not the bottom of the screen without moving my eyes downward. And when I can't see the bottom of the screen, I feel more like I am standing on the VR floor of the game, but being able to see the top of the screen or the VR sky area, does not seem to break the feeling of being there, as much as seeing the bottom of the screen does ???
Any Diy'ers notice this also and mount your screen lower than center ?
User avatar
Diorama
Binocular Vision CONFIRMED!
Posts: 273
Joined: Mon Jan 28, 2013 10:37 am
Location: Brighton, UK (Sometimes London)

Re: DIY Oculus Rift - schematics, instructions and build pic

Post by Diorama »

I've seen others mention that the bottom of the screen being invisible is really important for immersion; in fact in some of the official oculus dev kit photos it looks like they may have also placed the screen slightly offset down:

Image
geekmaster
Petrif-Eyed
Posts: 2708
Joined: Sat Sep 01, 2012 10:47 pm

Re: DIY Oculus Rift - schematics, instructions and build pic

Post by geekmaster »

Diorama wrote:I've seen others mention that the bottom of the screen being invisible is really important for immersion; in fact in some of the official oculus dev kit photos it looks like they may have also placed the screen slightly offset down:
...
That makes sense. I cannot look up past about 45-degrees before I see my eyebrows, but I have to look down at a very steep angle (about 80-degrees) to see my mustache. The Rift photo looks about right for those vertical viewing angles. That is also how I held my Nexus 7 while testing my fresnel lens stacks, so that I could fill that FoV (and somewhat beyond).
Last edited by geekmaster on Sat Feb 09, 2013 9:15 pm, edited 1 time in total.
User avatar
Diorama
Binocular Vision CONFIRMED!
Posts: 273
Joined: Mon Jan 28, 2013 10:37 am
Location: Brighton, UK (Sometimes London)

Re: DIY Oculus Rift - schematics, instructions and build pic

Post by Diorama »

Exactly, plus the fact that anyone wearing a baseball cap or kevlar helmet has something blocking the top of their vision but it's not an issue.
User avatar
Okta
Golden Eyed Wiseman! (or woman!)
Posts: 1515
Joined: Tue Feb 12, 2008 5:22 am

Re: DIY Oculus Rift - schematics, instructions and build pic

Post by Okta »

Diorama wrote:I've seen others mention that the bottom of the screen being invisible is really important for immersion; in fact in some of the official oculus dev kit photos it looks like they may have also placed the screen slightly offset down:

Image
That picture might be misleading if the lenses are also lower in the faceplate. For the offset screen to be true it would also have to be adjusted in the warping software with upwards bias but i haven't heard anything regarding that or noticed it in any screenshots?

Interesting idea though, shame if its a lost option now that the Rift is set in stone (dev kit at least).
"I did not chip in ten grand to seed a first investment round to build value for a Facebook acquisition."
Notch on the FaceDisgrace buyout.
geekmaster
Petrif-Eyed
Posts: 2708
Joined: Sat Sep 01, 2012 10:47 pm

Re: DIY Oculus Rift - schematics, instructions and build pic

Post by geekmaster »

The discussion in this thread of using fresnel lens stacks in a DIY Rift, for "supernatural" FoV, now has its own thread. Please continue any future discussions of that topic in its new thread:
http://www.mtbs3d.com/phpBB/viewtopic.php?f=140&t=16373
alienatorZ
One Eyed Hopeful
Posts: 12
Joined: Thu Dec 27, 2012 3:23 pm

Re: DIY Oculus Rift - schematics, instructions and build pic

Post by alienatorZ »

Just ordered a 7 inch and some lenses. Cant wait to start building.
PinkTyGRR
One Eyed Hopeful
Posts: 12
Joined: Tue Feb 12, 2013 2:54 pm

Re: DIY Oculus Rift - schematics, instructions and build pic

Post by PinkTyGRR »

This is so awesome! thanks for the awesome and detailed instructions that you also presented.
I've tried waiting for my rift to come in but i've caved and started ordering parts to build a low budget diy headmount.

I've seen and read a lot of people using the wii remote in front of the tv/monitor and using infrared lights for head tracking. From my own not very scientific experiments of taping the ir sensor to a hat and then trying with the wiimote on the hat it seemed like the wiimote on the head was more stable and accurate for tracking.

I'm wondering if anyone had experience with one being more accurate and responsive than the other for head tracking ignoring the fact that a couple ir lights are much lighter than a wiimote.

@ op: i think you mentioned that you are using a razer hydra for the tracking, how do u like that and is it okay mounted on your head? i may cave in and buy one.
geekmaster
Petrif-Eyed
Posts: 2708
Joined: Sat Sep 01, 2012 10:47 pm

Re: DIY Oculus Rift - schematics, instructions and build pic

Post by geekmaster »

More of us may do more of these DIY builds now that we learned that Chinese New Year and factory startup time got between us and the lucky 5,000 from the first few days of the kickstarter campaign.
Post Reply

Return to “Oculus VR”