Hey,
thanks for the positive feedback. Glad to hear that you like the movie.
Maybe you could share some more details around the shooting and production in in stereo 3D. Things like issues you had, problems you faced with both the hardware and software, so this could help other enthusiasts like you...

Yeah, well it's not as easy at it seems.

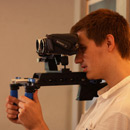
We drove to the location only after doing two little 3D tests. But 3D is more than just two cameras next to each other. Coming from making 2D movies I thought 3D filmmaking wouldn't be much more diffucult. It is important that you do some more tests in 3D, to get to know your cameras and know what you're able to do. What movements are possible, how near you can be the object without causing headaches, what cuts are possible... Well, we didn't do it. So I have to say, we had a lot of luck. After the first day of filming, I imported all the footage and was shocked. The 3D effects didn't work at all. The cameras had alot of height offset and also about 4° rotation offset which was due to our 3D rig. It has to be constructed perfectly if you want to get a clean stereoscopic image. But with our rig this wasn't possible, because we built it from different parts of our existing equipment. Pretty crazy stuff, we used the plate under the cameras from the rod support of our SGPro 35mm adapter and a Manfrotto hot shoe adapter was used to flip the one camera upside down which wasn't very solid. But it worked. In post you can do very much. Simply correct the height and rotation offset and you won't even notice capturing problem. That's the reason why we can only offer a 720p version and not 1080p altough we caputured 1080p footage (well technically 1080i footage^^).
Problematic is the big interocular distance of 6.5 cm which is about the distance of our eyes. But for a Hollywood production this would be way too much. On the big screen the whole depth increases and I doubt our film could play on a big cinema screen without causing headaches. I would have loved to use some kind of a mirror rig, but that wasn't in our budget. At least it works on monitors, TVs and small screens.
Well synching the both cameras was also a big problem. They don't have a LANC port but we had an infrared remote control which worked for both, HV20 and HV30. Actually synching via the remote control never worked. Often the cameras were a few seconds (!!!) off. So, synching using a clapperboard was necessary. In post I adjusted the two clips precisly frame to frame. Sometimes it seemed to me that even the sound wasn't synched completely so I had to correct the framing by looking at the motion of both videos very closely. If you're lucky both cameras are synched to the same frame (so the frame of one camera is not in between the frames of the other camera), but that doesn't happen very often.
So you have to live with it. In most cases this isn't critical, but fast motions might destroy the 3D effect a bit. I can see it when this happens (because I saw the film over and over again...) but you probably wouldn't notice.
Oh, and be overprotective and always check if both cameras record. Astonishingly we never forgot to do that. And god, I hate miniDV tapes. Sometimes parts of a take from one camera were damaged, so the take wasn't usable. Always use new tapes, old tapes tend to drive you crazy.

Of course this isn't a problem of 3D specificly but you have double the risk of unusable footage. If one view is damaged, the other one is also not usable.
We never used any zoom on the cameras because they weren't synched and more zoom without decreasing the interocular distance would cause more headaches. Also we had alot of problems with the focus. Like I said, the cameras weren't synched, so we had to trust the automatic focus. After both cameras were focussed on the same object we locked the focus. Sometimes it took more than a minute to let them focus on the right object

Automatic focus sucks... At least we had a high resolution 800x480 monitor available to check focus.
In post we tried avoiding stereoscopic window violations but due to our big interocular distance the infinty point was often too far away, so we had to push the stereoscopic window back a bit. But in general I recommend trying to avoid violations because it breaks the stereo effect a bit (BTW that was the only aspect I didn't like about Avatar
)
In After Effects I wrote a preset for processing the 3D material which was very useful. I don't pay for a 3D plugin. Stereoscopic footage is quite simple to process. Luckily I was able to preview everything directly on my Zalman 3D monitor in After Effects because you simply have create an interlaced image for which drivers aren't necessary. Using that preset I was able to implement visual effects, correct the offesets, match the colors of both views, set the convergence, colorcorrect the video, preview in any format (interlaced, red-cyan, blue-amber, green-magenta, side-by-side) and render out both seperate files.
Sadly it wasn't always possible to create the visual effects we wanted because everything has to be created twice and it has to be exactly at the correct place in the 3D space. And this is not as easy as it seems. Retouching is next to impossible if you don't want to spend your whole week on one take. ^^ It was very annoying to create every visual twice. The first time it's fun - yeah, well, rotoscoping for 10 hours isn't that much fun either - but imagine doing all that work a second time. Please take a look at all the windows in the movie. I had to rotoscope every window inside the castle to colorcorrect them darker in order to make it look like the sun wouldn't shine outside.
Editing in Premiere was quite comfortable. I used 4 tracks for the edit. Track no. 1 contains the left video, track no. 2 the right video, track no. 3 the right video again but with an interlaced effect applied. If you make only track 3 and track 1 visible, I was able to preview the 3D image on the Zalman. Track No. 4 contains the 2D video which is often a bit different from the 3D video. After arranging one take that way I grouped the video so could edit them easily.
I hope I could give you slight inside view into our 3D project. So, as you see, it's a self-made way of producing stereoscopic content, but after you're incorperated in the process, it works like charm (well, probably not, but works kinda fluently).
All in all, I can say, it was alot of fun and I loved producing this 3D movie. But for the next time, we will produce in 2D again until equipment gets cheaper and better software solutions become available (which will be probably sooner as I think
). Nevertheless the next CGI short movie we are currently working on will be released in S3D as well. So, stay tuned.

Oh, and @ Bloody: Thanks for promoting our movie on your blog. I've been following your blog for some months now and I really enjoy it. THX