Thanks for the info. Any idea if these are compatible with the AHRS plugins for FreePie/GlovePie?Krenzo wrote:There are several 9DOF IMUs available at SparkFun ranging from $80 to $125. All of the SparkFun boards require an extra $15 cable to connect to a PC via USB unless you piggyback on an Arduino or other microcontroller board.Yoder808 wrote:...the SparkFun IMU...
Here's an IMU board I saw that's only $16: http://www.mouser.com/ProductDetail/STM ... HaxA%3d%3d
Manufacturer site: http://www.st.com/internet/evalboard/product/254044.jsp The ARM Cortex-M4 on the board alone is worth the price, more powerful than the Atmel chips found on other IMU boards.
DIY Oculus Rift - schematics, instructions and build pics!
-
Yoder808
- One Eyed Hopeful
- Posts: 47
- Joined: Sat Sep 08, 2012 2:06 am
Re: DIY Oculus Rift - schematics, instructions and build pic
-
Krenzo
- Binocular Vision CONFIRMED!
- Posts: 265
- Joined: Tue Sep 07, 2010 10:46 pm
Re: DIY Oculus Rift - schematics, instructions and build pic
I can't say without looking at the software, but you definitely need to be comfortable with modifying source code to calibrate your IMU. If you're ok with modifying the code, then you should be able to get any IMU working with already made plug-ins no problem since they all pretty much spit their angular data out in serial format via a COM port. You would just have to make sure the data coming out is in the correct format.Yoder808 wrote:Thanks for the info. Any idea if these are compatible with the AHRS plugins for FreePie/GlovePie?
-
CyberVillain
- Petrif-Eyed
- Posts: 2166
- Joined: Mon Jun 22, 2009 8:36 am
- Location: Stockholm, Sweden
Re: DIY Oculus Rift - schematics, instructions and build pic
FreePIE has built in support both for razor ahrs and freeimu
Yoder808 wrote: Thanks for the info. Any idea if these are compatible with the AHRS plugins for FreePie/GlovePie?
-
sevenalvan

- One Eyed Hopeful
- Posts: 18
- Joined: Wed Jan 21, 2009 12:16 am
Re: DIY Oculus Rift - schematics, instructions and build pic
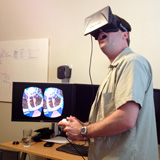
Hello fellow 3d enthusiasts, I've been lurking here for a while and decided to take the plunge and build my own rift while awaiting my pre-order of the real thing.
So here is my Oculus Rip-off!....
Initially inspired by the heroic efforts of Rod Furlan, I've had a couple of goes using the 1280x800 panel and VGA/HDMI board from Vitrolight (very helpful supplier) and also the 5x mag lenses off ebay recommended by Rod.
The first attempt worked well enough but was a bit messy and suffered from image overlap issues now fixed by using a dividing panel between each eye and the lcd screen.
I started with Rod's initial design using 4mm black foam board and gaffer tape but have modified it a bit along the way:
1. Tried the goggle approach but found it uncomfortable...now using a baseball cap approach which is very comfortable as it spreads the weight evenly across the head.
2. The HMD has two compartments...the 1st in black (see photos) contains the lenses at one end and the lcd at the other. The second compartment in silver contains the controller board and keypad and this is "hinged onto the black box by two gaffer tape strips. This allows the user to undo one strip and tilt up the silver box to gain access to the board and the panel. The panel itself is dropped into a "frame" at one end of the black box (its a snug fit and secured with small strips of gaffer tape) and is therefore very easy to remove for cleaning if specs of dust make their way onto the screen.
3. The blinkers on either side of the hat are tape covered panels of foam board that keep extraneous light off the lenses and help with immersion. This is further improved by the "beard" below the HMD which is made from a porous rubber fabric I had lying around (actually its designed as a non slip surface) that allows air flow but can be tucked up under the HMD to allow almost complete immersion.
Also, be careful with transporting these units outside...I burnt a small hole in my LCD, I think from transporting the headset in my car and the sun being magnified onto the screen....new panel on order! The "beard" on the version 2 HMD has the advantage that it can be folded up when the HMD is not in use to protect the lenses from damage and burning a hole in the LCD! (see photo).
I am very surprised how good the result is....only used it on 3d movies and Flight Simulator X so far.
For movies its a bit like being in the front row of the cinema but with FSX it really comes into its own....sure you can see pixels and the image ratio is a bit distorted but after a couple of minutes you forget this and are instead overwhelmed by the sensation of being there. I use the track IR5 optical tracker for head movements as it works well with FSX.
I've owned at time the z800, vuzix, cinemizer oled (best of the bunch for movie watching), HMZ-1 and ST1080 (poor ergonomics) and although many of these have better resolution they suffer from the tunnel vision problem with a limited FOV for FSX. I'm a real world pilot and have built many simulators and my Rift rip-off is more engaging and immersive than any of them. This approach has a fantastic future, cant wait for a finished product and a native 1080p panel.
Thinking about Mk3 and got my Makerbot Replicator 2 3d Printer on order for Xmas.
all the best
Mark
You do not have the required permissions to view the files attached to this post.
-
brantlew

- Petrif-Eyed
- Posts: 2221
- Joined: Sat Sep 17, 2011 9:23 pm
- Location: Menlo Park, CA
Re: DIY Oculus Rift - schematics, instructions and build pic
@sevenalvan: Very nice work! It speaks volumes for how light the unit is that a baseball cap is sturdy enough to support it. TrackIR supported games will really shine on the Rift once all the warp injectors start coming available.
Edit: Nice collection of HMD's. Interesting that you like the Cinemizer so much. Haven't heard a whole lot about it.
Edit: Nice collection of HMD's. Interesting that you like the Cinemizer so much. Haven't heard a whole lot about it.
-
Bretspot
- Cross Eyed!
- Posts: 176
- Joined: Fri Sep 28, 2012 9:59 am
Re: DIY Oculus Rift - schematics, instructions and build pic
I can't wait for my real rift.
A screenshot from a game, a piece of cardboard, two lenses, and my kindle fire ain't cutting it .
.
Your build looks great. I love hearing all these 'very immersive' reviews.
Who else is ready to go to Mars, or wherever else? I know I am!
A screenshot from a game, a piece of cardboard, two lenses, and my kindle fire ain't cutting it
Your build looks great. I love hearing all these 'very immersive' reviews.
Who else is ready to go to Mars, or wherever else? I know I am!

-
Mel
- Binocular Vision CONFIRMED!
- Posts: 287
- Joined: Sat Nov 10, 2007 7:45 am
Re: DIY Oculus Rift - schematics, instructions and build pic
Really great stuff, sevenalvan. I am part way thru building my own Rift knock-off, and was fully intending to mount it on the recommended goggles, but after seeing your work, I am definitely going to go for the baseball cap approach. Looks clean and comfortable.sevenalvan wrote:Hello fellow 3d enthusiasts, I've been lurking here for a while and decided to take the plunge and build my own rift while awaiting my pre-order of the real thing.
<snip>
Mark
Below is what I've done so far. Still waiting on the lenses. Man oh man, USPS service into Canada is shamefully aweful. The first set of lenses the seller shipped out went missing, and I'm coming up on week 2 waiting for the second set. I expect they'll be at least another two weeks, if history repeats.
You do not have the required permissions to view the files attached to this post.
-
zacherynuk

- Binocular Vision CONFIRMED!
- Posts: 296
- Joined: Sun Oct 03, 2010 2:56 pm
- Location: England
Re: DIY Oculus Rift - schematics, instructions and build pic
Great job sevenalvan! - Looking good Mel 
Must be well over a dozen decent clones now
Must be well over a dozen decent clones now
-
sevenalvan
- One Eyed Hopeful
- Posts: 18
- Joined: Wed Jan 21, 2009 12:16 am
Re: DIY Oculus Rift - schematics, instructions and build pic
Thanks everyone, and yes Brantlaw I have spent waaay too much money on HMD's over the years only to build the most immersive myself for a couple of hundred bucks and a lot of gaffer tape!
I like the cinemizer OLED because it is clearly a well built and well thought out product. Its very comfortable (the best of the list by far), easy to use, has diopter correction, small battery pack and nice carry case. Its a great portable solution for use with the macbook air or ipod/pad...although the odd native resolution makes text difficult to read. Movies however are just great and its a keeper for travelling on long flights. Not sure I would want to put my oculus rip-off on my face on board a plane!
Mel, your build looks like its coming along very nicely....look forward to seeing the end result.
I just came across another idea today...I have in my office some promotional "stubby holders" in a black foam rubber. These are what us Aussies call a foam rubber sleeve to hold a cold can of beer on a hot day. Anyway, they are black foam rubber and just the right size that if cut at an angle will fit over the lenses to provide soft, squishy eyecups that will completely block out the light so I can dispense with the side blinkers....will post photos if they work.
cheers
Mark
You do not have the required permissions to view the files attached to this post.
-
djdevin

- Two Eyed Hopeful
- Posts: 55
- Joined: Wed Oct 17, 2012 1:10 pm
- Location: Philadelphia, USA
Re: DIY Oculus Rift - schematics, instructions and build pic
Wouldn't using a baseball cap make the unit more prone to falling off? e.g. looking up/downsevenalvan wrote: 1. Tried the goggle approach but found it uncomfortable...now using a baseball cap approach which is very comfortable as it spreads the weight evenly across the head.
Anyone think of using a cap (or other head support) and the goggles simultaneously?
-
Mel
- Binocular Vision CONFIRMED!
- Posts: 287
- Joined: Sat Nov 10, 2007 7:45 am
Re: DIY Oculus Rift - schematics, instructions and build pic
That's exactly what I'm going to try. Comfort-wise, I really like the idea of a cap, but I would also like the external light shielding provided by goggles. So I'm going to merge the two.djdevin wrote:Wouldn't using a baseball cap make the unit more prone to falling off? e.g. looking up/downsevenalvan wrote: 1. Tried the goggle approach but found it uncomfortable...now using a baseball cap approach which is very comfortable as it spreads the weight evenly across the head.
Anyone think of using a cap (or other head support) and the goggles simultaneously?
I'll post a picture when it's done (again, I'm still awaiting delivery of my lenses, and further progress depends on them).
-
bobv5
- Certif-Eyed!
- Posts: 529
- Joined: Tue Jan 19, 2010 6:38 pm
Re: DIY Oculus Rift - schematics, instructions and build pic
Palmer/Dycus, just to point out the obvious, screen burn is bad. You should probably include a lens cover, or at least a bright coloured bit of paper with a warning on it. For the commercial version you could make the box really nice and market it as a free uber mega leet Rift carry case.
"If you have a diabolical mind, the first thing that probably came to mind is that it will make an excellent trap: how do you get off a functional omni-directional treadmill?"
-
Mel
- Binocular Vision CONFIRMED!
- Posts: 287
- Joined: Sat Nov 10, 2007 7:45 am
Re: DIY Oculus Rift - schematics, instructions and build pic
Hey all,
My 5x aspheric lenses arrived today and I was finally able to get my Rift-clone up and running. My first impressions are, unfortunately, not good. I was hoping someone might be able to give me some suggestions to try to improve (or more accurately, get a workable) image going.
Setup:
- My measured IPD is 5.5cm, but I have mounted the lenses at 6.25cm, which is basically splitting the difference between the screen halve's centers (7cm center to center) and my true IPD.
- I have the lenses mounted about 5.5cm from the LCD, which gives my eyes the best focus, but at the expense of being able to easily see all four edges of the LCD. I have 20/20 vision, FWIW.
- I am using Tridef DDD in SBS mode.
- Running Portal 2 as test game.
Problem:
- No matter what adjustments I make to the DDD driver (and there only seems to be one adjustment that actually has any effect on the rendered scene: Scene Depth Increase/Decrease), I cannot get my brain to merge the two images into one coherent 3D whole. It seems like I need to adjust the separation (this I *think* I know from my now dust-collecting iZ3D monitor) , but as far as I can tell, DDD provides no such adjustment.
Can anyone shed some light on how IPD relates to SBS game rendering, and what adjustment(s), if any, can be done (specifically, using DDD) to get the best experience with a given IPD?
Thanks all.
-
PalmerTech
- Golden Eyed Wiseman! (or woman!)
- Posts: 1644
- Joined: Fri Aug 21, 2009 9:06 pm
Re: DIY Oculus Rift - schematics, instructions and build pic
You can adjust the in-game IPD using DDD, but the center of each camera remains in the same place on the LCD. Do you have a spare pair of lenses? If so, pull up a game on the LCD, and then hold the lenses up to your eyes. Shift them inwards and outwords. At some point, the image should merge for your eyes.
This is not a perfect solution, mind you. You are abusing the limits of the exit pupil, and there will be asymmetrical distortion to deal with as well, which will be especially evident in the corners of the image. Definitely usable, though!
This is not a perfect solution, mind you. You are abusing the limits of the exit pupil, and there will be asymmetrical distortion to deal with as well, which will be especially evident in the corners of the image. Definitely usable, though!
-
Fredz
- Petrif-Eyed
- Posts: 2255
- Joined: Sat Jan 09, 2010 2:06 pm
- Location: Perpignan, France
- Contact:
Re: DIY Oculus Rift - schematics, instructions and build pic
According to djdevin the panel you have should be a HV056WX2-100 which should haveMel wrote:- My measured IPD is 5.5cm, but I have mounted the lenses at 6.25cm, which is basically splitting the difference between the screen halve's centers (7cm center to center) and my true IPD.
the same dimensions than the HV056WX1-100 according to panelook, ie. 120.96 x 75.6 mm.
So shouldn't the screen halve's centers be 60.48 mm center to center instead of 7 cm ? That's much closer to your own IPD of 5.5cm and could help you fuse the two images if you can't find a stereo 3D driver with IPD adjustement.
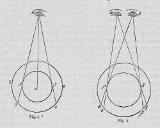
I guess you could also slightly tilt the lenses outward in the same way foisi did with his 7.2" display as shown here http://www.mtbs3d.com/phpbb/viewtopic.p ... 100#p63100 :
Then you should be able to adjust the depth in the TriDef 3D driver to suit your IPD I guess.
EDIT: Palmer beat me to it, that was fast.
-
Mel
- Binocular Vision CONFIRMED!
- Posts: 287
- Joined: Sat Nov 10, 2007 7:45 am
Re: DIY Oculus Rift - schematics, instructions and build pic
Hi Fredz,Fredz wrote:According to djdevin the panel you have should be a HV056WX2-100 which should haveMel wrote:- My measured IPD is 5.5cm, but I have mounted the lenses at 6.25cm, which is basically splitting the difference between the screen halve's centers (7cm center to center) and my true IPD.
the same dimensions than the HV056WX1-100 according to panelook, ie. 120.96 x 75.6 mm.
So shouldn't the screen halve's centers be 60.48 mm center to center instead of 7 cm ? That's much closer to your own IPD of 5.5cm and could help you fuse the two images if you can't find a stereo 3D driver with IPD adjustement.
I guess you could also slightly tilt the lenses outward in the same way foisi did with his 7.2" display as shown here http://www.mtbs3d.com/phpbb/viewtopic.p ... 100#p63100 :
Then you should be able to adjust the depth in the TriDef 3D driver to suit your IPD I guess.
EDIT: Palmer beat me to it, that was fast.
You are certainly right regarding center-to-center screen centers
In any case, as I mentioned to Palmer, I'm happy to say my problems inexplicably fixed themselves simply by restarting Portal 2. On with game testing and proper HMD mounting (on a ball cap or goggles, or both).
Thanks.
-
Mel
- Binocular Vision CONFIRMED!
- Posts: 287
- Joined: Sat Nov 10, 2007 7:45 am
Re: DIY Oculus Rift - schematics, instructions and build pic
OK, I finally got my HDM built and did some preliminary testing. Here's a quick summary, starting with the less than stellar pics:
Gaming impressions:
Overall, the experience was pretty good, but I have to be honest and say that I was somewhat underwhelmed. The feeling of immersion, while much better than running on a passive 3D display (like my old iZ3D), was not as pronounced as I was hoping it would be. There are a few factors which detracted from the experience:
1. Obviously, screen resolution, but everyone knows this already and it's really easy to ignore when you pay attention to the game and not the screen. Of course, future iterations of this technology will certainly correct this.
2. Perhaps due to the distance between the lenses and the LCD (a distance I set so my eyes could properly focus on the screen), I am easily able to see all four edges of the screen, thus the FOV is somewhat diminished. I don't know how to measure it, but I'm fairly certain the FOV is less than the 90-100 or so degrees others are getting (I assume they are getting). This is also not a deal breaker, but still a distraction.
3. Colors are severely washed out on my LCD. I bought the same unit as djdevin, here: http://www.mtbs3d.com/phpBB/viewtopic.p ... 507#p85507. Not the fault of HDMs, just the quality of the screen.
4. I tried several games so far...comments in order of playability:
a. Portal 2: by far the best experience, the above 3 'issues' notwithstanding. Best feeling of immersion so far.
b. GTA IV: pretty cool, but as you can see from the above images, the left and right screens have different lighting levels, so the combined effect is unsatisfying. I think this is a Tridef DDD problem (I suspect all games had this problem; it was just most pronounced in GTA).
c. Bioshock 2: OK, but felt somewhat claustrophobic, probably due to incorrect aspect ratio. This can, perhaps, be fixed by someone else's driver.
d. Arma 2: Horrible. I couldn't for the life of me, get the DDD settings configured in such a way as to get a coherent 3D image. Huge separation between left and right, even with depth set to 0. Instant headache playing this one.
e. Elder Scrolls: Skyrim. Same problem as Arma 2. Not even remotely playable until I can figure out how to tweak DDD so my head won't explode. And someone else mentioned problems with textures...I agree. Everything looks ugly.
I will be trying out several other titles over the next few days, and will try to report on the results.
5. I do not have a head-tracking solution in place right now, and I expect the immersion level to improve greatly once I do. I have a TrackIR 5 on order, and I'll report back after I've tested it out.
Sorry to be the 'downer' guy, but I gotta call it as I see it. I'm hoping some more tweaking will improve the experience for me. And I hope the unit Palmer is building will be much more refined.
You do not have the required permissions to view the files attached to this post.
-
Yoder808
- One Eyed Hopeful
- Posts: 47
- Joined: Sat Sep 08, 2012 2:06 am
Re: DIY Oculus Rift - schematics, instructions and build pic
Mel, how close are your lenses to the screen, and your eyes to the lenses?
I had to tweak mine a little. I can't see the top and bottom of the screen no matter how hard I try, but I can see the left and right if I try. As for GTA, have you tried Power 3D mode (formerly known as Virtual 3D mode)? You can toggle it by default with shift-control-v. Also, in the monitor setup, have to tried swapping between parallel and cross-eyed for ARMA or Skyrim?
I would say head tracking will help your immersion a lot. If you have an iPhone, and Android phone, or a WiiMote, you can setup some easy head tracking. Also, you can build your own IR clip to use with FreeTrack, but TrackIR makes a fine product.
Looks good, sorry to hear it didn't meet your expectations. Hopefully a little tweaking can fix some of your issues.
-
Mel
- Binocular Vision CONFIRMED!
- Posts: 287
- Joined: Sat Nov 10, 2007 7:45 am
Re: DIY Oculus Rift - schematics, instructions and build pic
Hi Ypder808,Yoder808 wrote:Mel, how close are your lenses to the screen, and your eyes to the lenses?
I had to tweak mine a little. I can't see the top and bottom of the screen no matter how hard I try, but I can see the left and right if I try. As for GTA, have you tried Power 3D mode (formerly known as Virtual 3D mode)? You can toggle it by default with shift-control-v. Also, in the monitor setup, have to tried swapping between parallel and cross-eyed for ARMA or Skyrim?
I would say head tracking will help your immersion a lot. If you have an iPhone, and Android phone, or a WiiMote, you can setup some easy head tracking. Also, you can build your own IR clip to use with FreeTrack, but TrackIR makes a fine product.
Looks good, sorry to hear it didn't meet your expectations. Hopefully a little tweaking can fix some of your issues.
The lenses are about 5.5cm from the LCD and my eyes are probably about a centimeter from the lenses. I tried moving the lenses closer to the LCD, but the image goes blurry quite quickly; 5.5cm seemed to be the optimal distance.
I just tried Power3D mode in three games: GTA, Arma 2 and Skyrim. It appeared to have no visual effect except turning all three into a slide-show. However, I don't know if you read one of my previous posts, but the simple act of re-starting the games made all the difference in the world as far as 3D is concerned. All three of the aforementioned games looked fine the second time I started each one up. I have no explanation for this, and I will most definitely try restarts before reporting on poor game behaviour.
Some more games I tried:
1. Alice: Madness Returns. Looks awesome, but third person perspective kinda sucks. Game designers will definitely need to work on this for Oculus support.
2. I Am Alive: Also looks great, but same problem with 3rd person mode.
3. Dear Esther: Looks fabulous, but my god, it's one mind-numbingly boring 'game'.
4. Torchlight: 3D platformer, and surprisingly (or maybe not) one of the best looking titles under the HMD. Really enjoyed playing this one.
5. I just bought Freespace 2 for 3 bucks, and out of the box it doesn't support DirectX (at least that's what the DDD driver claims, and I couldn't get it to work). I need to look into this further.
6. I'm gonna try FS X tomorrow. Really looking forward to it.
After all the fiddling, my impression of the HDM has changed for the better. It's pretty darn cool, and I can't wait to see what my TrackIR 5 will do for it. And I've decided I also need to upgrade my graphics card.
-
Yoder808
- One Eyed Hopeful
- Posts: 47
- Joined: Sat Sep 08, 2012 2:06 am
Re: DIY Oculus Rift - schematics, instructions and build pic
Hmm... I'm going to have to try Alice!
For first person in Alice enable the Console window by going into Settings and looking for Game Options. Then while playing a game, press ~ (the tilde key) to bring down the console and enter one of the following codes.
cg_cameradist -45 Enables first person view.
cg_cameradist 128 Returns from first person view to the default view.
See the full list here http://alice.wikia.com/wiki/Cheats
Glad to hear your opinion is improving. Head tracking will make a huge difference. I've notice 3rd person games look pretty amazing, but need a further camera distance than default to be playable.
-
djdevin
- Two Eyed Hopeful
- Posts: 55
- Joined: Wed Oct 17, 2012 1:10 pm
- Location: Philadelphia, USA
Re: DIY Oculus Rift - schematics, instructions and build pic
I've noticed that the colors got washed out when I set the resolution very high (1920x1080) and it seems like the display tries to resample everything down. On the display it actually says "1080p" in the OSD. When I take it down to the standard resolution the color difference is extremely noticeable.Mel wrote: 3. Colors are severely washed out on my LCD. I bought the same unit as djdevin, here: http://www.mtbs3d.com/phpBB/viewtopic.p ... 507#p85507. Not the fault of HDMs, just the quality of the screen.
Nice hat mod, btw. How did you attach it to the box?
-
Mel
- Binocular Vision CONFIRMED!
- Posts: 287
- Joined: Sat Nov 10, 2007 7:45 am
Re: DIY Oculus Rift - schematics, instructions and build pic
Thanks, Yoder.Yoder808 wrote:Hmm... I'm going to have to try Alice!
For first person in Alice enable the Console window by going into Settings and looking for Game Options. Then while playing a game, press ~ (the tilde key) to bring down the console and enter one of the following codes.
cg_cameradist -45 Enables first person view.
cg_cameradist 128 Returns from first person view to the default view.
See the full list here http://alice.wikia.com/wiki/Cheats
Glad to hear your opinion is improving. Head tracking will make a huge difference. I've notice 3rd person games look pretty amazing, but need a further camera distance than default to be playable.
I've been out of the gaming world for a while (repetitive gameplay, nothing new and exciting being released) and need to re-learn some game tweaking skills. The Oculus Rift single-handedly re-ignited my interest in gaming, and I immediately went on a game buying streak right after pre-ordering the Rift. Thanks for giving me a reason to care again, Palmer.
-
Mel
- Binocular Vision CONFIRMED!
- Posts: 287
- Joined: Sat Nov 10, 2007 7:45 am
Re: DIY Oculus Rift - schematics, instructions and build pic
Good tip on the colour problem, djdevin. I'll give it a go. I am still working on how to best set game resolutions, in particular how to make new settings stick between runs. I'm seeing some weirdness that I'll eventually get figured out.djdevin wrote:I've noticed that the colors got washed out when I set the resolution very high (1920x1080) and it seems like the display tries to resample everything down. On the display it actually says "1080p" in the OSD. When I take it down to the standard resolution the color difference is extremely noticeable.Mel wrote: 3. Colors are severely washed out on my LCD. I bought the same unit as djdevin, here: http://www.mtbs3d.com/phpBB/viewtopic.p ... 507#p85507. Not the fault of HDMs, just the quality of the screen.
Nice hat mod, btw. How did you attach it to the box?
To attach the housing to the hat I cut out two half moon-shaped pieces of foam core, whose curves matched that of the cap's visor. I glued these pieces into the hat, then glued the housing to them. The whole thing is pretty front-heavy, so until I can lighten it up by moving the controller board off the HMD, I am going to add some counter-weight to the back of the hat.
You do not have the required permissions to view the files attached to this post.
-
cybereality

- 3D Angel Eyes (Moderator)
- Posts: 11407
- Joined: Sat Apr 12, 2008 8:18 pm
-
Mel
- Binocular Vision CONFIRMED!
- Posts: 287
- Joined: Sat Nov 10, 2007 7:45 am
Re: DIY Oculus Rift - schematics, instructions and build pic
Wow! I just tried Mirror's Edge using DDD and even with no head tracking, it's a real trip. I got a good whack of vertigo in some spots. I can hardly wait for Cyber's driver and my head tracking gear to arrive.
Attempted MS Flight Simulator X, but the game won't start with DDD driver running (hangs loading textures). One other person on Tridef's forums complained of the exact same symptom a few days ago, but got no response. I added my voice to the chorus, but still waiting on this one.
I hacked the nose section from the goggles I had ordered and glued it into my HMD. It comfortably supports the weight of the unit, so I don't think I'm going to add counter-ballast on the back. I now need add light shielding around the entire view area, which I'll do with some foam.
-
aqua3ds
- One Eyed Hopeful
- Posts: 6
- Joined: Thu Nov 15, 2012 5:23 am
Re: DIY Oculus Rift - schematics, instructions and build pic
Hi Marksevenalvan wrote:
I like the cinemizer OLED because it is clearly a well built and well thought out product. Its very comfortable (the best of the list by far), easy to use, has diopter correction, small battery pack and nice carry case. Its a great portable solution for use with the macbook air or ipod/pad...although the odd native resolution makes text difficult to read. Movies however are just great and its a keeper for travelling on long flights. Not sure I would want to put my oculus rip-off on my face on board a plane!
Do you mind giving a more detailed review on Cinemizer OLED?
I used to own two HMDs a couple of years ago and I could not use either for more than 30 mins due to discomfort.
Hence I badly wanted a HMD that is comfortable to use for prolonged period of time (say 2 - 3 hrs).
Does the Cinemizer OLED fits my requirement?
Also can you comment on the low resolution 870 x 500 display? Is it suitable for gaming on Xbox 360 and PS3?
Thanks in advance!
-
sevenalvan
- One Eyed Hopeful
- Posts: 18
- Joined: Wed Jan 21, 2009 12:16 am
Re: DIY Oculus Rift - schematics, instructions and build pic
Hello Aqua3ds
Sorry for the late reply but have been away in the bush without internet coverage and now just home.
Why do I like the Cinemizer Oled....I think its best features are comfort (which is exceptional by the standard of most HMD's) and simplicity.
Its fair to say that when I put the Cine Oled on my face after wearing my Oculus clone it is a bot underwhelming at first.
Thats because the screen size is quite small...like looking at a 24" monitor in a blacked out room at a normal desk/chair position,
However the colours and black depth are really great and 2d or 3d movie content is great to watch once you have adjusted to the small field of view. Of course your eyes just have to look ahead to the image while watching a movie instead if hunting all over the place when wearing the Oculus close to watch a movie....ie much more relaxing to use the Cine Oled to watch films.
As for games...well the only thing Ive tried is Flight Simulator X (FSX) and it works fine but its kind of odd to have such a small FOV ...you get used to it and at interpolated 1080p resolution and top/bottom 3d the result is highly impressive but still a bit detached compared to the Oculus or even the Sony HMZ-1. FSX with my Oculus clone is another world, literally, although small gauges are hard to read unless you program a quick zoom button to have a close look at the panel if required.
I cant say what the PS3 or xbox would be like as Ive not tried however if they support 1080p output (or even 720p) then I expect the interpolated image will be plenty detailed enough for impressive gaming...just dont expect full FOV filling wonder..more like a personal monitor. The diopter adjustment for short sighted people is great and very well implemented...I use it without my glasses.
My cinemizer offers side by side and top bottom 3d at 720p and top bottom and interleaved at 1080p.
The comfort levels should easily meet your requirements. The Cine Oled and battery pack are also small and light and easy to carry around.
Overall I give it 4* out of 5 and its a keeper for me.
cheers
Mark
-
cybereality
- 3D Angel Eyes (Moderator)
- Posts: 11407
- Joined: Sat Apr 12, 2008 8:18 pm
Re: DIY Oculus Rift - schematics, instructions and build pic
@sevenalvan: Nice! Thanks for the quick review.
-
Nick3DvB

- Binocular Vision CONFIRMED!
- Posts: 311
- Joined: Wed Oct 06, 2010 10:51 am
- Location: UK
Re: DIY Oculus Rift - schematics, instructions and build pic
Hi guys, I like all these ingenious cap mounts, I was going to go down that route myself, I wear one most days anyway and for extended use I prefer the air-flow it offers over a goggle mod. Even if Palmer does end up throwing a housing in with the first 100 DIY kits I'm going to give it a go.
http://www.mtbs3d.com/phpBB/viewtopic.p ... 825#p86825
thanks
sevenalvan wrote:For movies its a bit like being in the front row of the cinema but with FSX it really comes into its own....
I was hoping to ask you DIY'ers a favour, Mark mentioned the issues with watching video on the Rift, I'm working on a solution that should make watching video a lot more comfortable, it does reduce the effective "screen size" but tries to keep the immersion level using AmbiLight effects and head-tracking (eventually). It's very early days but I have uploaded some test videos you can try, I'd be very interested to get your feedback!sevenalvan wrote:... Of course your eyes just have to look ahead to the image while watching a movie instead if hunting all over the place when wearing the Oculus close to watch a movie.... ie much more relaxing to use the Cine Oled to watch films
http://www.mtbs3d.com/phpBB/viewtopic.p ... 825#p86825
thanks
-
Mel
- Binocular Vision CONFIRMED!
- Posts: 287
- Joined: Sat Nov 10, 2007 7:45 am
Re: DIY Oculus Rift - schematics, instructions and build pic
Hi Nick,Nick3DvB wrote:Hi guys, I like all these ingenious cap mounts, I was going to go down that route myself, I wear one most days anyway and for extended use I prefer the air-flow it offers over a goggle mod. Even if Palmer does end up throwing a housing in with the first 100 DIY kits I'm going to give it a go.
sevenalvan wrote:For movies its a bit like being in the front row of the cinema but with FSX it really comes into its own....I was hoping to ask you DIY'ers a favour, Mark mentioned the issues with watching video on the Rift, I'm working on a solution that should make watching video a lot more comfortable, it does reduce the effective "screen size" but tries to keep the immersion level using AmbiLight effects and head-tracking (eventually). It's very early days but I have uploaded some test videos you can try, I'd be very interested to get your feedback!sevenalvan wrote:... Of course your eyes just have to look ahead to the image while watching a movie instead if hunting all over the place when wearing the Oculus close to watch a movie.... ie much more relaxing to use the Cine Oled to watch films
http://www.mtbs3d.com/phpBB/viewtopic.p ... 825#p86825
thanks
I'm trying to test out the videos you uploaded but can't, for the life of me, find where in the downloaded Media Player Classic app I turn on SBS mode (I assume I'm supposed to use Media Player Classic that was installed by Smooth Video installer, correct?).
-
Nick3DvB
- Binocular Vision CONFIRMED!
- Posts: 311
- Joined: Wed Oct 06, 2010 10:51 am
- Location: UK
Re: DIY Oculus Rift - schematics, instructions and build pic
Sorry I wasn't very clear, you don't need to install SVP, it's a great mediaplayer but MPC has no specific 3D features (yet)Mel wrote:I assume I'm supposed to use Media Player Classic that was installed by Smooth Video installer, correct?
I was talking about the Stereoscopic player from here: http://www.3dtv.at/Index_en.aspx
The first two clips I posted are half frame (one eye) so I was thinking you could just load it them in SBS mode.
But I have added a full frame clip (still mono-scopic) that should work in any mediaplayer set to full screen (4:5 aspect-ratio).
https://rapidshare.com/files/248979335/SBS.mkv
It might still have a black border around it, caused by the warp correction, but I'm working on fixing that...
You probably want to set the Rift to native 1280x800 resolution, to stop the LCD re-scaling anything.
Best keep on-topic so let me know in the other thread if you need any help with the settings.
Thanks for helping test it out.
-
djdevin
- Two Eyed Hopeful
- Posts: 55
- Joined: Wed Oct 17, 2012 1:10 pm
- Location: Philadelphia, USA
Re: DIY Oculus Rift - schematics, instructions and build pic
Just wanted to follow up on an issue way earlier in the thread, regarding some of the displays locking to 1280x720...
I fixed it! Got the LCD OSD to display "1280x800@60hz"
I think the problem is with the EDID information being incorrect (for us) but correct for other uses (displaying TV 720p)
I had to use PowerStrip and manually create a monitor driver with a 1280x800 setting. Strange huh? But it works now...
I fixed it! Got the LCD OSD to display "1280x800@60hz"
I think the problem is with the EDID information being incorrect (for us) but correct for other uses (displaying TV 720p)
I had to use PowerStrip and manually create a monitor driver with a 1280x800 setting. Strange huh? But it works now...
-
Mel
- Binocular Vision CONFIRMED!
- Posts: 287
- Joined: Sat Nov 10, 2007 7:45 am
Re: DIY Oculus Rift - schematics, instructions and build pic
That's curious, dj, as I have never had a problem with my LCD (the same one as yours). The first time I powered it up, Windows reported it as 1280x720, but I simply used the NVidia Settings dialog to change it to 1280x800 and it's recognized as such ever since. Maybe I'm missing something?djdevin wrote:Just wanted to follow up on an issue way earlier in the thread, regarding some of the displays locking to 1280x720...
I fixed it! Got the LCD OSD to display "1280x800@60hz"
I think the problem is with the EDID information being incorrect (for us) but correct for other uses (displaying TV 720p)
I had to use PowerStrip and manually create a monitor driver with a 1280x800 setting. Strange huh? But it works now...
I have the HMD plugged in to one of the two DVI ports on my GTX-285, using a DVI-to-HDMI converter. To play a game, I start by typing 'Windows Key-P ' and selecting 'Duplicate', which automatically switches resolution to the lowest of the two devices attached to my system (in my case, my HMD...1280x800), and I then start up whatever game I want thru DDD's interface. Works great.
-
Okta

- Golden Eyed Wiseman! (or woman!)
- Posts: 1515
- Joined: Tue Feb 12, 2008 5:22 am
Re: DIY Oculus Rift - schematics, instructions and build pic
Can you elaborate on the resolution switching shortcut. I will be looking for things like this to reduce the clusterf0ck that starting a game on the Rift will require. Also would be good if the shortcut made the Rift the primary display, then another to switch everything back to normal for your primary monitor once you finish, rather than a million clicks in the display settings.Mel wrote:
I have the HMD plugged in to one of the two DVI ports on my GTX-285, using a DVI-to-HDMI converter. To play a game, I start by typing 'Windows Key-P ' and selecting 'Duplicate', which automatically switches resolution to the lowest of the two devices attached to my system (in my case, my HMD...1280x800), and I then start up whatever game I want thru DDD's interface. Works great.
"I did not chip in ten grand to seed a first investment round to build value for a Facebook acquisition."
Notch on the FaceDisgrace buyout.
Notch on the FaceDisgrace buyout.
-
aqua3ds
- One Eyed Hopeful
- Posts: 6
- Joined: Thu Nov 15, 2012 5:23 am
Re: DIY Oculus Rift - schematics, instructions and build pic
Hi Marksevenalvan wrote:Hello Aqua3ds
Sorry for the late reply but have been away in the bush without internet coverage and now just home.
Why do I like the Cinemizer Oled....I think its best features are comfort (which is exceptional by the standard of most HMD's) and simplicity.
Its fair to say that when I put the Cine Oled on my face after wearing my Oculus clone it is a bot underwhelming at first.
Thats because the screen size is quite small...like looking at a 24" monitor in a blacked out room at a normal desk/chair position,
However the colours and black depth are really great and 2d or 3d movie content is great to watch once you have adjusted to the small field of view. Of course your eyes just have to look ahead to the image while watching a movie instead if hunting all over the place when wearing the Oculus close to watch a movie....ie much more relaxing to use the Cine Oled to watch films.
As for games...well the only thing Ive tried is Flight Simulator X (FSX) and it works fine but its kind of odd to have such a small FOV ...you get used to it and at interpolated 1080p resolution and top/bottom 3d the result is highly impressive but still a bit detached compared to the Oculus or even the Sony HMZ-1. FSX with my Oculus clone is another world, literally, although small gauges are hard to read unless you program a quick zoom button to have a close look at the panel if required.
I cant say what the PS3 or xbox would be like as Ive not tried however if they support 1080p output (or even 720p) then I expect the interpolated image will be plenty detailed enough for impressive gaming...just dont expect full FOV filling wonder..more like a personal monitor. The diopter adjustment for short sighted people is great and very well implemented...I use it without my glasses.
My cinemizer offers side by side and top bottom 3d at 720p and top bottom and interleaved at 1080p.
The comfort levels should easily meet your requirements. The Cine Oled and battery pack are also small and light and easy to carry around.
Overall I give it 4* out of 5 and its a keeper for me.
cheers
Mark
Thank you very much for the detailed review.
I used to own 2 HMDs but can't barely use them over 30mins (due to discomfort).
I am placing order for the Cinemizer OLED now ... my 3rd HMD
-
Mel
- Binocular Vision CONFIRMED!
- Posts: 287
- Joined: Sat Nov 10, 2007 7:45 am
Re: DIY Oculus Rift - schematics, instructions and build pic
I am running a dual monitor setup on my Windows 7 box using a Geforce GTX-285 graphics card. One monitor is a standard 23" wide-screen LCD running at 1920x1080, and the other is my HMD running at 1280x800. The standard LCD is set as my Primary Monitor, so DirectX games will always be rendered on it. However, if I hold down the 'Windows' key and tap 'P', I get the following monitor output changer:Okta wrote:Can you elaborate on the resolution switching shortcut. I will be looking for things like this to reduce the clusterf0ck that starting a game on the Rift will require. Also would be good if the shortcut made the Rift the primary display, then another to switch everything back to normal for your primary monitor once you finish, rather than a million clicks in the display settings.Mel wrote:
I have the HMD plugged in to one of the two DVI ports on my GTX-285, using a DVI-to-HDMI converter. To play a game, I start by typing 'Windows Key-P ' and selecting 'Duplicate', which automatically switches resolution to the lowest of the two devices attached to my system (in my case, my HMD...1280x800), and I then start up whatever game I want thru DDD's interface. Works great.
My usual setting is 'Extend', which allows each monitor to run independent of the other. But if I select 'Duplicate', then the resolution of my primary monitor is automatically bumped down to match the lower resolution of my HMD -- 1280x800 -- and whatever image is rendered on it, including DirectX games, gets 'duplicated' on the HMD (so spectators can see the SBS rendering of the game on the standard monitor at the same time your brain is merging the same image thru the HMD
The only down-side of this trick is that the process of switching between the two output modes scrambles any desktop icon layout you may have. This is actually a pretty big annoyance for me because I am one of those people who litters my desktop with icons (I know where each and every one of them is) and the Windows-P mode switch makes a mess of the desktop. I will no doubt fix this at some point by installing a desktop icon position saving utility of some kind (mind you, I haven't had much luck with such things in the past -- none seem to work as advertised. Any recommendations would be great:)).
You do not have the required permissions to view the files attached to this post.
-
Okta
- Golden Eyed Wiseman! (or woman!)
- Posts: 1515
- Joined: Tue Feb 12, 2008 5:22 am
Re: DIY Oculus Rift - schematics, instructions and build pic
Thanks, i gather the windows/p is a feature of windows7? Im still on good ole XPMel wrote:I am running a dual monitor setup on my Windows 7 box using a Geforce GTX-285 graphics card. One monitor is a standard 23" wide-screen LCD running at 1920x1080, and the other is my HMD running at 1280x800. The standard LCD is set as my Primary Monitor, so DirectX games will always be rendered on it. However, if I hold down the 'Windows' key and tap 'P', I get the following monitor output changer:Okta wrote:Can you elaborate on the resolution switching shortcut. I will be looking for things like this to reduce the clusterf0ck that starting a game on the Rift will require. Also would be good if the shortcut made the Rift the primary display, then another to switch everything back to normal for your primary monitor once you finish, rather than a million clicks in the display settings.Mel wrote:
I have the HMD plugged in to one of the two DVI ports on my GTX-285, using a DVI-to-HDMI converter. To play a game, I start by typing 'Windows Key-P ' and selecting 'Duplicate', which automatically switches resolution to the lowest of the two devices attached to my system (in my case, my HMD...1280x800), and I then start up whatever game I want thru DDD's interface. Works great.
My usual setting is 'Extend', which allows each monitor to run independent of the other. But if I select 'Duplicate', then the resolution of my primary monitor is automatically bumped down to match the lower resolution of my HMD -- 1280x800 -- and whatever image is rendered on it, including DirectX games, gets 'duplicated' on the HMD (so spectators can see the SBS rendering of the game on the standard monitor at the same time your brain is merging the same image thru the HMD
The only down-side of this trick is that the process of switching between the two output modes scrambles any desktop icon layout you may have. This is actually a pretty big annoyance for me because I am one of those people who litters my desktop with icons (I know where each and every one of them is) and the Windows-P mode switch makes a mess of the desktop. I will no doubt fix this at some point by installing a desktop icon position saving utility of some kind (mind you, I haven't had much luck with such things in the past -- none seem to work as advertised. Any recommendations would be great:)).
I have my main monitor (40 inch lcd) at 1080 and also a 50 inch plasma connected at 720 and was considering using the remaining display port for the Rift. Like you my desktop is completely full id icons from various dabblings that get scattered half across to the TV every time i drop my resolution
"I did not chip in ten grand to seed a first investment round to build value for a Facebook acquisition."
Notch on the FaceDisgrace buyout.
Notch on the FaceDisgrace buyout.
-
EdZ
- Sharp Eyed Eagle!
- Posts: 425
- Joined: Sat Dec 22, 2007 3:38 am
Re: DIY Oculus Rift - schematics, instructions and build pic
I'll add that the Win+P shortcut also remembers your settings if devices are removed and reattached. I currently have my 1920x1200 desktop monitor as primary, and my 1920x1080 TV as secondary. When the TV is off, the output is purely to the monitor. When I turn on the TV (well, the AV receiver), my desktop will automatically extend to that, as well as switch from the on-board sound card to outputting over HDMI.
With the RIFT, you would plug it in, set the correct resolution (i.e. 1280x800) and only then set the Win+P mode to 'duplicate'. Once you unplug the RIFT (or turn off the adapter box), your display mode will switch back to normal for your main display, and when your turn the RIFT back on, you'll automatically switch to 1280x800 for both displays.
With the RIFT, you would plug it in, set the correct resolution (i.e. 1280x800) and only then set the Win+P mode to 'duplicate'. Once you unplug the RIFT (or turn off the adapter box), your display mode will switch back to normal for your main display, and when your turn the RIFT back on, you'll automatically switch to 1280x800 for both displays.
-
Mel
- Binocular Vision CONFIRMED!
- Posts: 287
- Joined: Sat Nov 10, 2007 7:45 am
Re: DIY Oculus Rift - schematics, instructions and build pic
It's a pretty sweet feature, for sure.EdZ wrote:I'll add that the Win+P shortcut also remembers your settings if devices are removed and reattached. I currently have my 1920x1200 desktop monitor as primary, and my 1920x1080 TV as secondary. When the TV is off, the output is purely to the monitor. When I turn on the TV (well, the AV receiver), my desktop will automatically extend to that, as well as switch from the on-board sound card to outputting over HDMI.
With the RIFT, you would plug it in, set the correct resolution (i.e. 1280x800) and only then set the Win+P mode to 'duplicate'. Once you unplug the RIFT (or turn off the adapter box), your display mode will switch back to normal for your main display, and when your turn the RIFT back on, you'll automatically switch to 1280x800 for both displays.
Do you know if it's a Windows 7-specific thing, or an nVIDIA thing, or a combo of both?
-
mahler

- Sharp Eyed Eagle!
- Posts: 401
- Joined: Tue Aug 21, 2012 6:51 am
Re: DIY Oculus Rift - schematics, instructions and build pic
It works on Win7+ATI for me.Mel wrote:It's a pretty sweet feature, for sure.
Do you know if it's a Windows 7-specific thing, or an nVIDIA thing, or a combo of both?